Node Red
Staring in PLC Shift Manager version 2.28 (January 2026), it is possible to create configuration objects for Node Red. Node Red is a graphical, event-driven, IoT-centric system that allows users to easily work with industrial IO, sensors and protocols. The PLC Shift implementation of Node Red objects is specific to the requirements of the PLC Shift runtime and allows for rapid and simple configuration of the following features:
-
Read and write data from IO devices using the Modbus protocol.
-
Read and write data from the PLC Shift runtime using the OPC UA protocol.
-
Convert, scale, and otherwise work with IO type data.
Node Red objects in PLC Shift Manager can be exported as JSON that is suitable for import into Node Red. Once objects are in Node Red, they can be edited as required to handle site specific or sensor specific requirements before being deployed. Our aim is not to create a Node Red systems that are perfect for all applications, but to make it easy to create an initial deployment that does the majority of the work, but that can be easily modified to meet your exact requirements.
Node Red Objects in PLC Shift Manager can be exported as JSON and imported into Node Red using the browser interface.
|
The Node Red configuration is a part of a device configuration in PLC Shift Manager. This means that the Node Red configuration is copied when a device is copied, and is also exported to and imported from disk. This makes it easy to keep track of configurations for different systems, since everything is in PLC Shift Manager.
Starting in version 2.39 (April 2026), the Node Red configuration is downloaded to the remote device on a download operation and uploaded from the remote device on an upload operation. The remote device doesn't do anything with the configuration other than storing it, but this allows the remote device to be a single source of truth for the entire configuration.
Take care when uploading a configuration from a remote device when you have a local node red configuration. If there is no configuration stored on the remote it is possible to erase the local configuration!
|
Node Red Configuration in PLC Shift Manager
Export from PLC Shift Manager into Node Red
Installation
Installing Node Red depends on your specific hardware and operating system. Detailed instructions can be found here. Internet access will be required to install Node Red, but is not required to run Node Red. Note that some hardware that is commonly used with PLC Shift, like SCADAPack 47xi, already has Node Red installed.
Internet access is required to install Node Red, but is not required to use Node Red.
|
Before Node Red can be installed, the node.js runtime must be installed. As of January 2026, node.js version 22.x LTS is recommended. Instructions to install this version of node.js on Debian based systems can be found here.
Once node.js is installed, running the install script to install Node Red will almost always work and is usually the best approach. The script will also allow you to create a user with a password during installation, which is very strongly recommended.
If you use the install script, do not run it with sudo (super user) privileges.
|
The script will also install a systemd unit file to make it easy to stop and start the service. Although a systemd unit file is created, Node Red is not configured to automatically start on boot up. Run the command: sudo systemctl enable nodered.service to start Node Red automatically when the system starts.
The script lets you choose the version to install. It will not always upgrade the system if an older version is installed. To force an update, run the script and explicitly specify a new version. A screen grab of the command with a specific version is below. The version is the version of node.js.

Run the Install Script with a Flag for the Version
Once the Node Red runtime is installed, it can be accessed graphically via any web browser. The default port is 1880.
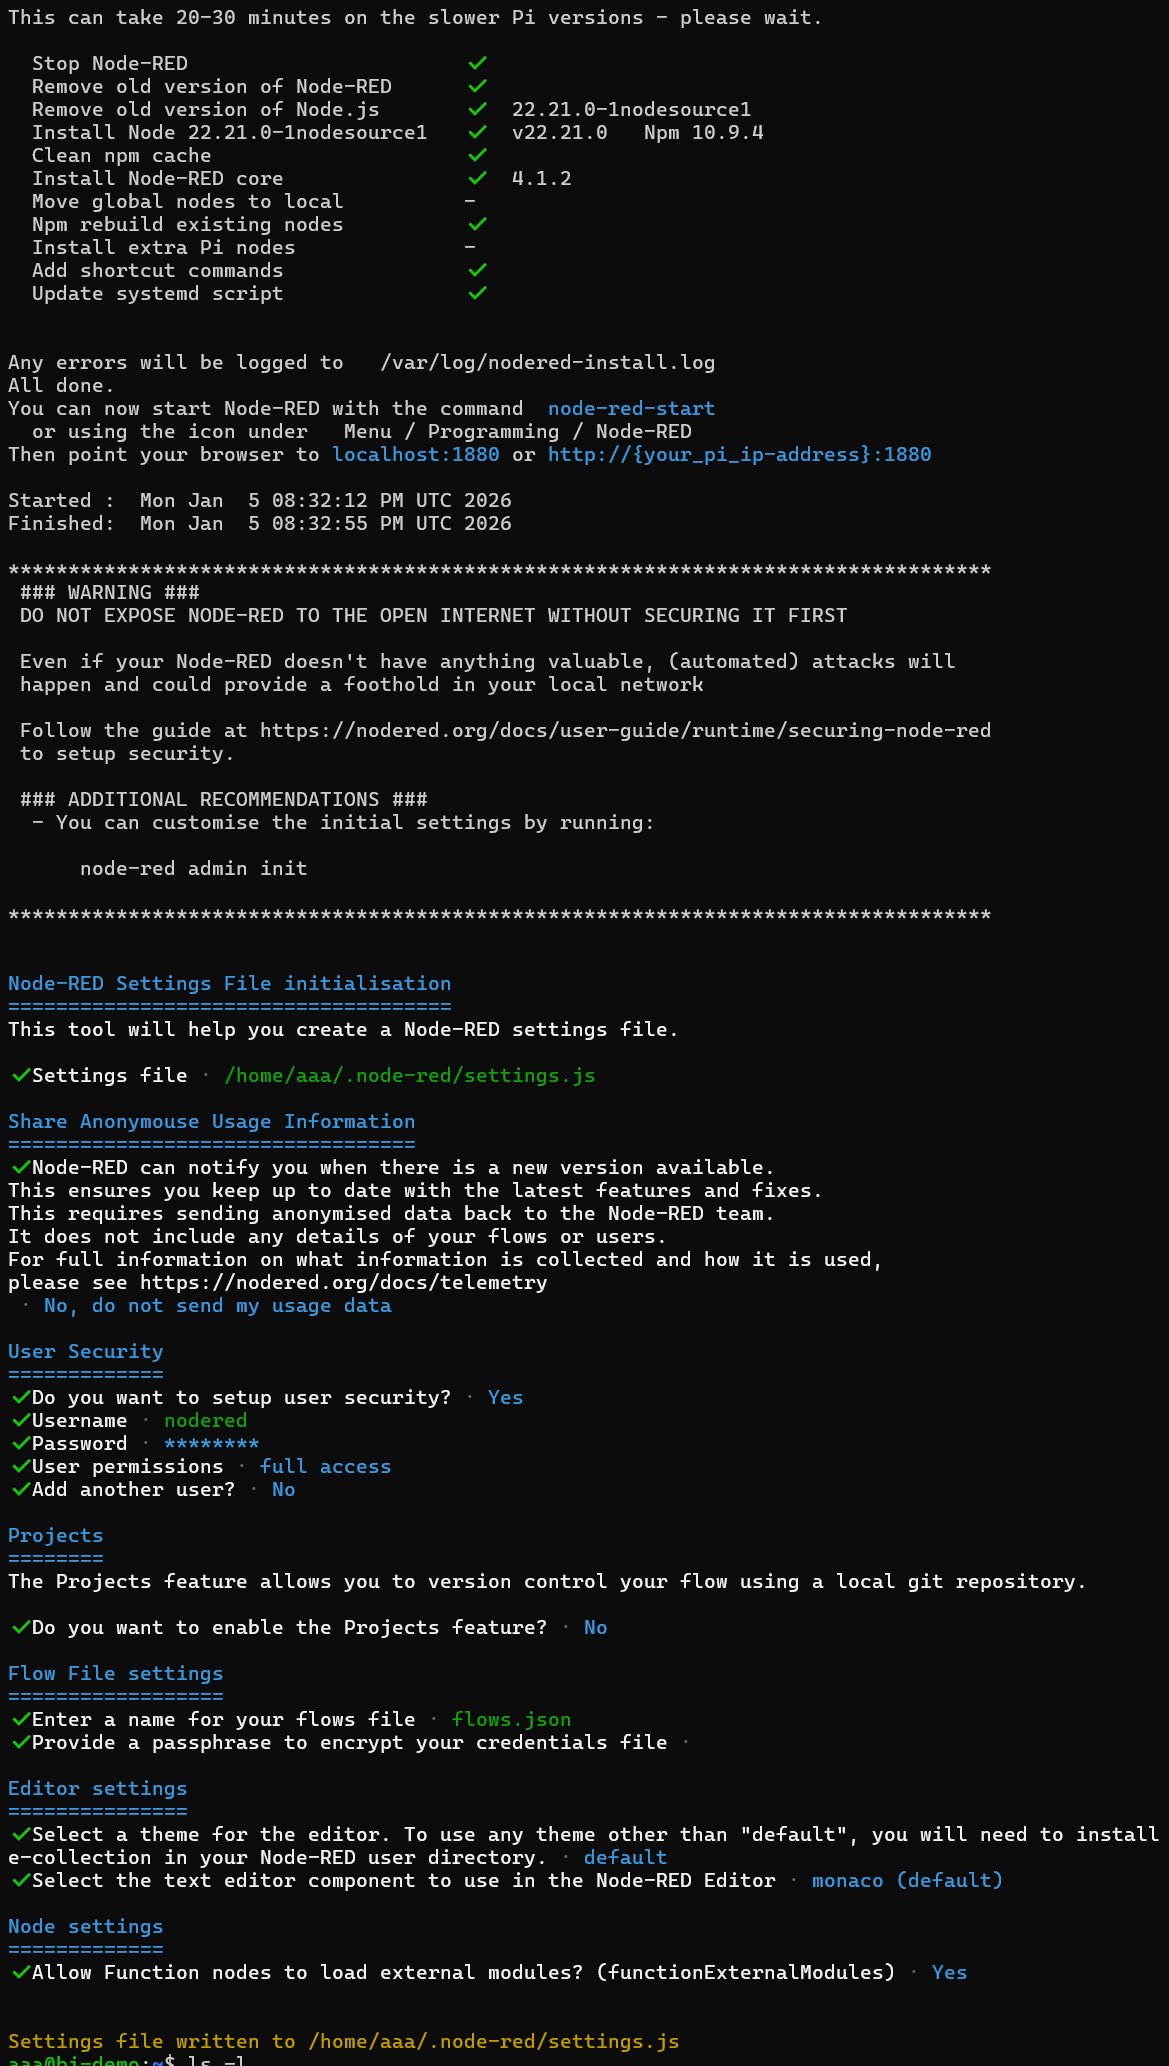
Node Red Installation Script
Required Libraries
After the installation of the Node Red runtime, the libraries listed below must be installed. Follow the instructions here to use the Node Red palette to install libraries. This can be done in a point and click fashion once you have a web browser connected to the Node Red runtime.
-
node-red-contrib-opcua. This library is used for the OPC UA server that the PLC shift runtime communicates with and the OPC UA client that is used to read tags from the server and make them available to Node Red objects.
-
node-red-contrib-modbus. This library allows you to read and write to devices and sensors using the Modbus protocol.
Installing via the palette will only install the latest the latest version of a library. To install a specific version, use the 'npm install' command from the '~./node-red' directory and specify a version. For example, to install version 0.2.345 of the OPC UA library, you can type: npm install --unsafe-perm --no-update-notifier --no-fund --no-audit node-red-contrib-opcua@0.2.345
Generally speaking, it is always okay to install the latest version of a library, however during our testing, we found an issue with node-red-contrib-opcua version 0.2.348 and this version will not work. We have tested version 0.2.345 and that version is known to work.
Restart the Node Red runtime after installing modules: sudo systemctl restart nodered.service
Do not use node-red-contrib-opcua version 0.2.348. This version was tested and does not work correctly. All values will always be 0.
|

Node Red Palettes Menu with Required Libraries Installed
Persistence
The PLC Shift implementation of Node Red has optional support for persistence. Persistence allows tag values to be written to and read from disk, which means that the tag values survive Node Red restarts, computer reboots, and power outages. If persistence is desired, then the 'settings.js' file in the hidden '.node-red' directory in your home directory needs to be modified. Details on persistence can be found at here.
Run the 'persist-nr-plc-shift.sh' script that can be found in the PLC Shift deployment bundle to modify the '~/.node-red/settings.js' file to enable persistence. The actual command is: ./persist-nr-plc-shift.sh
To enable persistence run the 'node-red-persist.sh' script from the PLC Shift deployment bundle. Do not use 'sudo'.
|
The script modifies the 'settings.js' file so that an additional entry is made in the 'contextStorage' JSON. Specifically, a new storage type called 'persistent' is created that writes values to disk, instead of to memory. Without this storage type, tag values will only ever be saved to memory and will not be durable across restarts. The updated section in 'settings.js' is shown below. If the script doesn't work on your system, then these changes can be made manually.
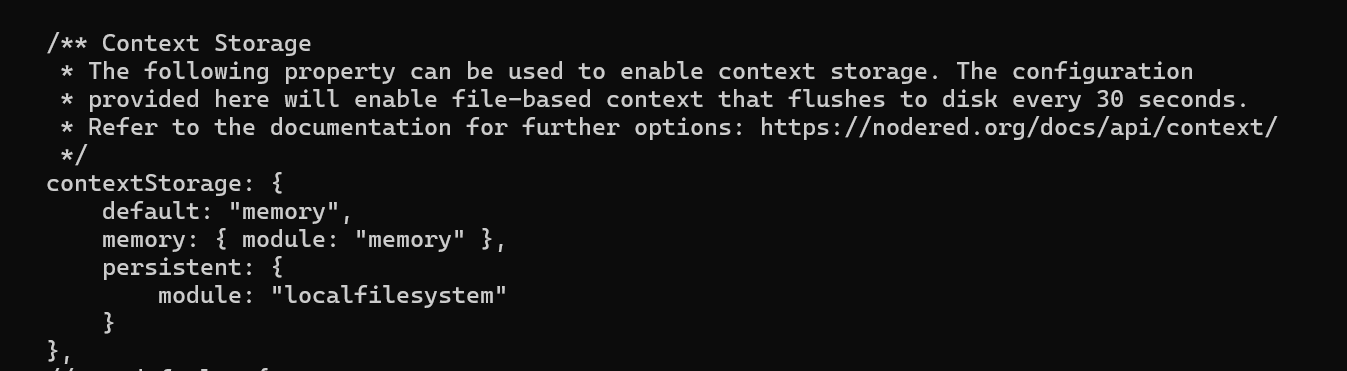
Updated settings.js
Persistence objects created in PLC Shift Manager assume that a global storage context named 'persistent' exists.
|
General Information
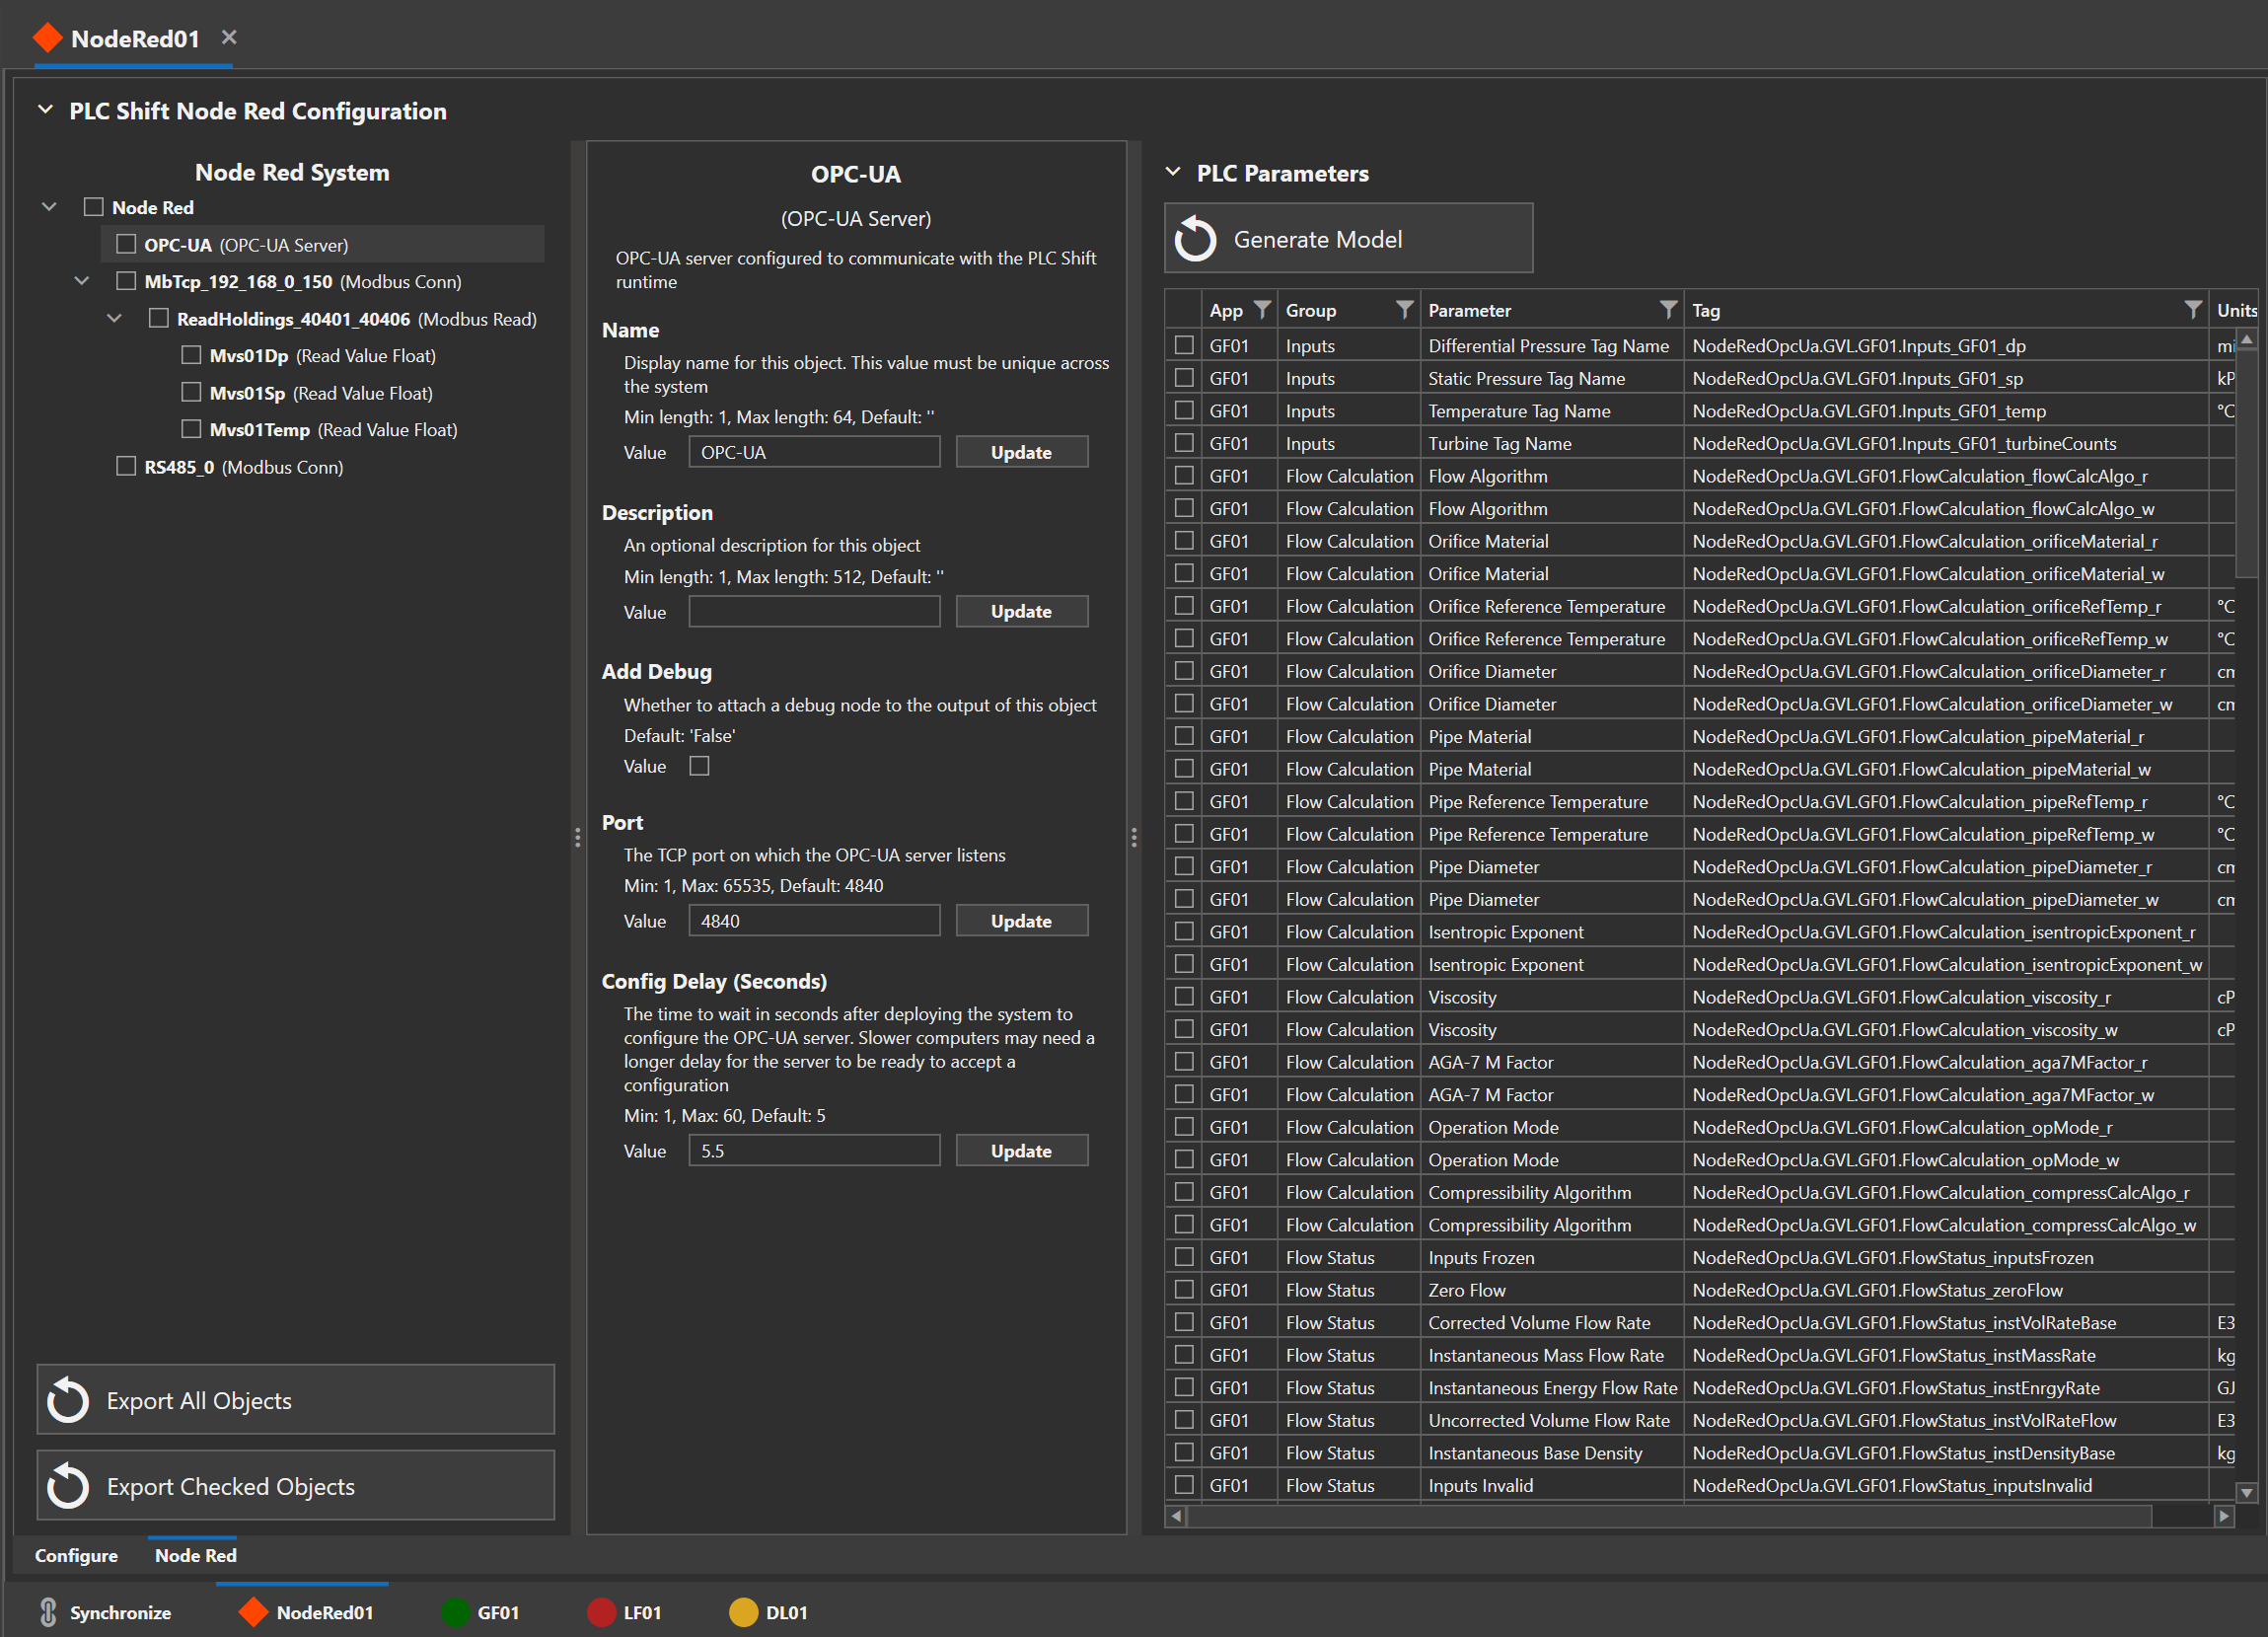
In PLC Shift Manager, at the Device level, a new 'Node Red' tab has been added. This can be seen in the PLC Shift Manager screen grab at the top of this page. This tab contains a tree view that is the heart of the Node Red system.
Node Red objects in PLC Shift manager are organized hierarchically. Generally speaking, when the system is exported into Node Red, parent nodes will automatically be wired to child nodes and will pass messages and configuration to their children.
Each type of object in the tree view can only have children of a specific type. For example, a 'Modbus Connection' object can only have a Modbus read or write objects as children. In the same way, a 'Modbus Connection' object can only be created directly under the system root, and cannot be created as the child of any other object type.
This constrained approach allows for simplification compared to just creating objects in Node Red. Additionally, the amount of configuration that is exposed for each object in PLC Shift Manager is minimal when compared to the options that are available in Node Red. However, when a PLC Shift Node Red object is imported into Node Red, all the configuration options can be edited from the Node Red editor, so there are no constraints to what is possible.
The OPC UA server object will always exist and cannot be deleted. The PLC Shift runtime communicates with the Node Red runtime using OPC UA.
Selecting an object in the tree view and then right clicking on it will show you a menu with the options listed below.
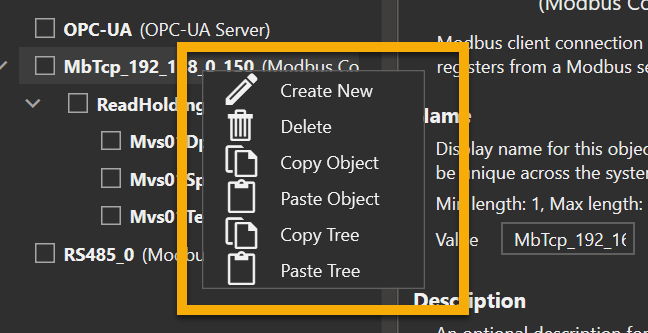
Node Red Object Context Menu
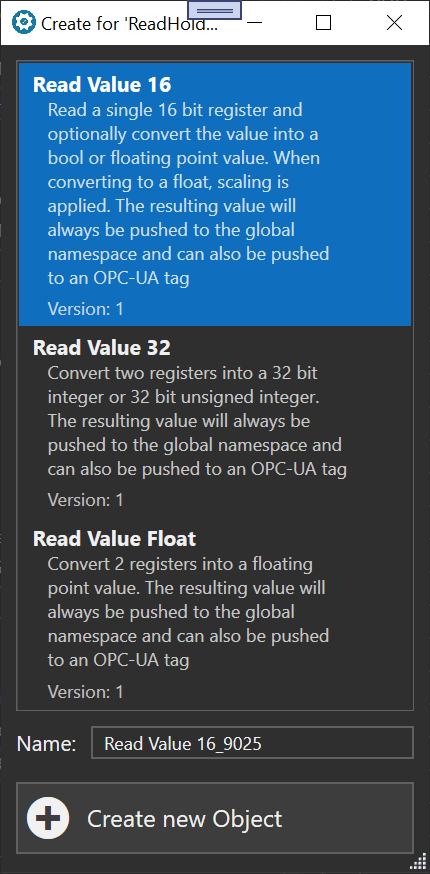
Create Object
Select this option to create a child object under the currently selected object. When selected, a new window will open that allows you to select the type of object to create. Objects will be created with a random name, but the name can be changed later on. Note that all object names must be unique across the system, and that for some types of objects, like Modbus read values, the object name is also the name of the tag that the value is stored under in the global context.
Object names must be unique across the system.
|
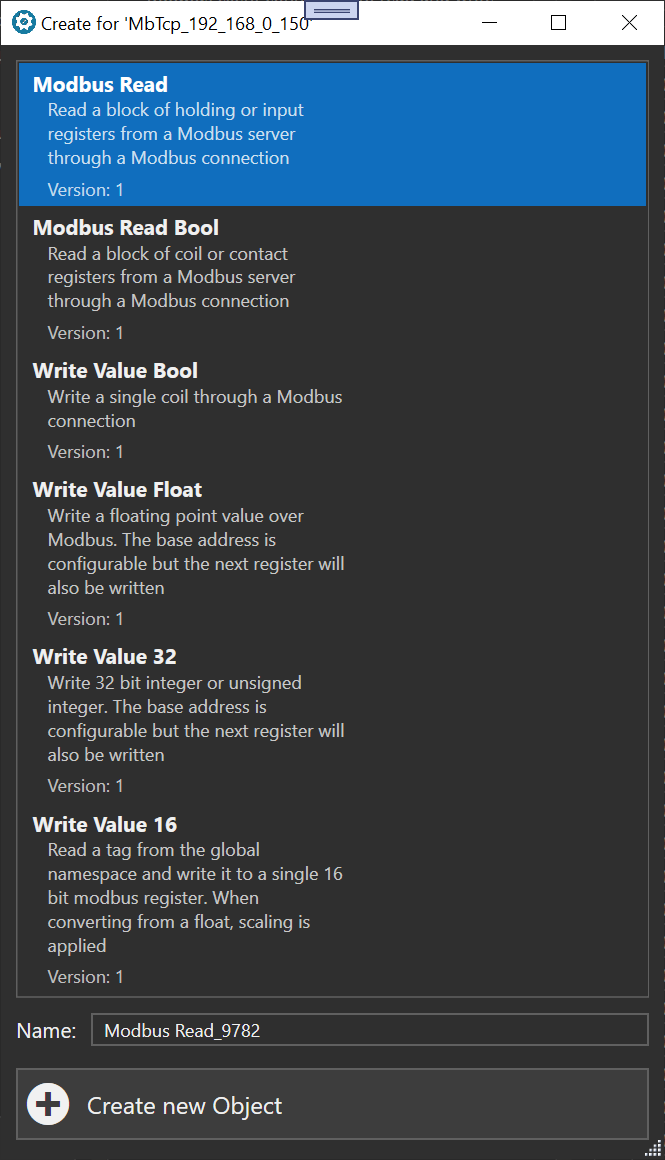
Create Object for a Modbus Connection Object
Delete
This option deletes the object and all its children.
Copy Object
This option stores the configuration of the selected object for pasting later on. Children of the selected object are not copied. The object can be pasted back to the Node Red system on this device, or to another device, allowing you to move Node Red configurations from one device to another.
Paste Object
This option allows you to create a new single child object under the selected object. This option is only available if an object was previously copied using the 'Copy Object' command and if the selected node can have a child of the copied object type.
Copy Tree
This option stores the configuration of the selected object and its children for pasting later on. The object can be pasted back to the Node Red system on this device, or to another device.
Paste Tree
This option allows you to create a child along with its children under the selected object. This option is only available if an object was previously copied using the 'Copy Tree' command and if the selected node can have a child of the copied object type.
Export
Use the export buttons underneath the tree view to export just selected object or the entire system. This will show an new window with JSON to create the exported object in Node Red. You can click in the text area, type 'ctrl-a' to select all the text, and then type 'ctrl-c' to copy all the text. In Node Red, type 'ctrl-i' for import, and then paste the JSON to import the configuration.
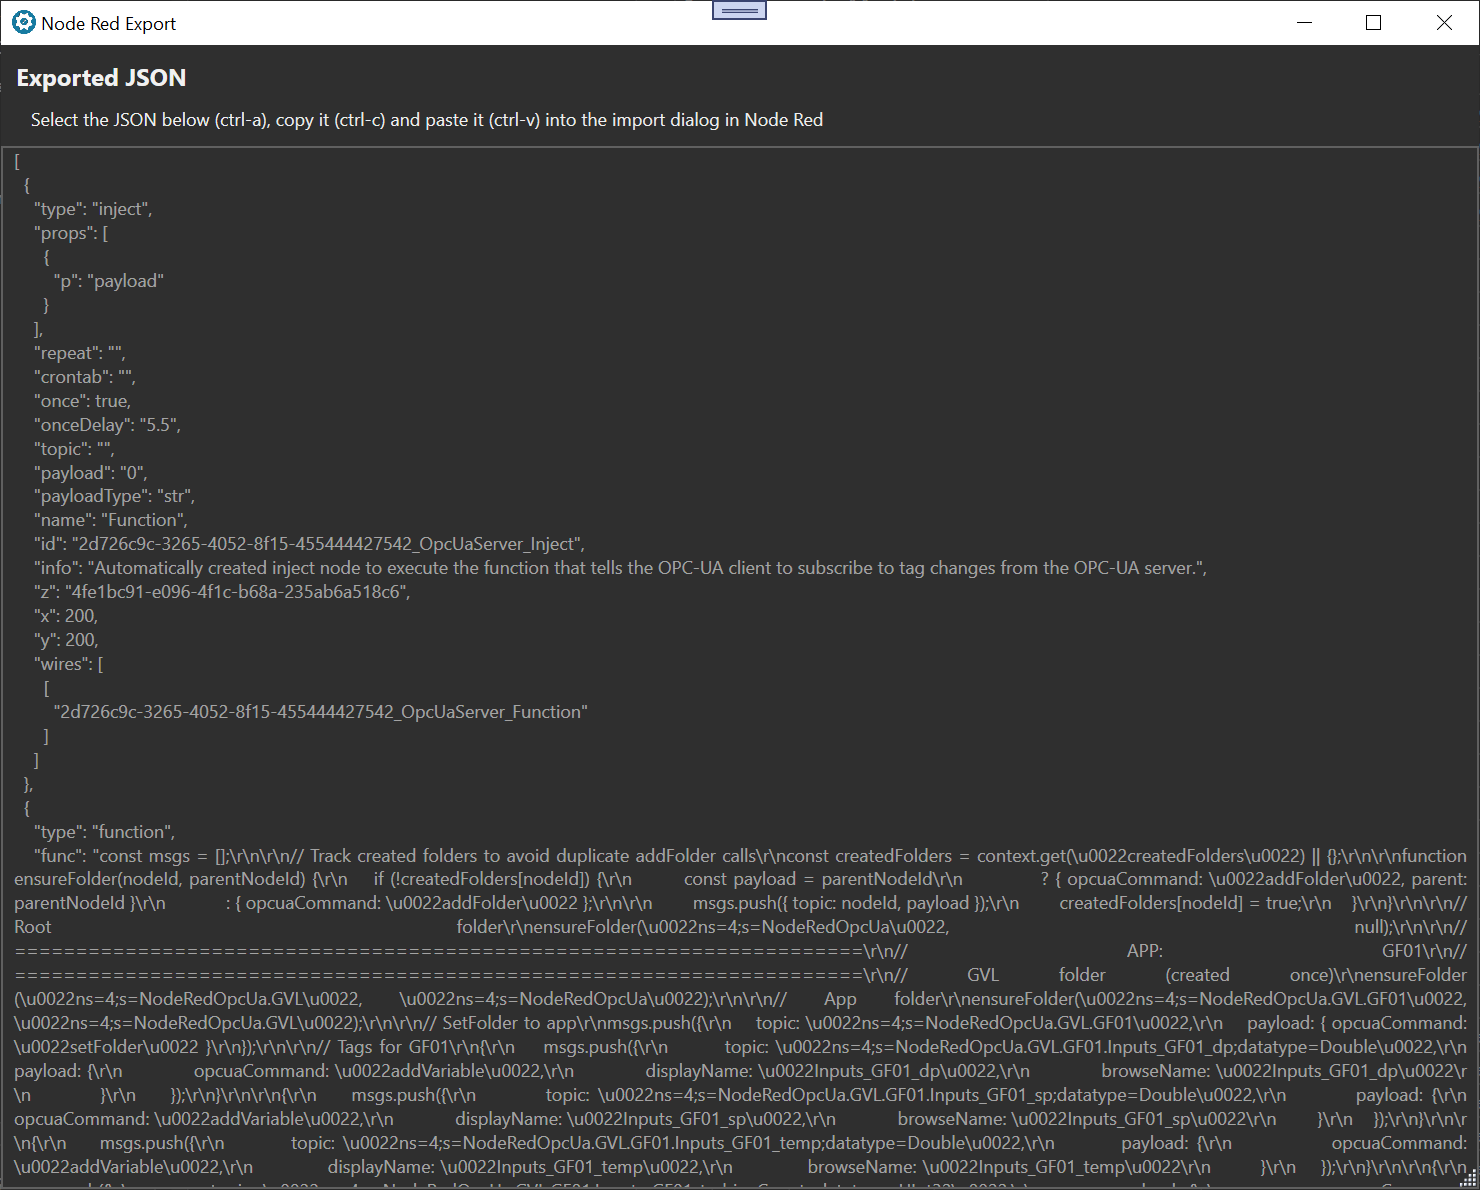
Node Red Export Window
Some objects are not exported as graphical objects. For example, a 'Modbus Connection' object is exported as a configuration object and does not appear as a graphical element in the work area.
When iterating on a solution, it's sometimes useful to completely clean out the existing configuration from Node Red before importing a new configuration. If you do this, make sure to find and delete all the unused configuration objects, so that you don't end up with duplicates.
When deleting a configuration from Node Red, make sure to find unused global objects and delete them.
|
To see configuration nodes, which do not appear in the working area, open the sidebar, click the 'i' button, open the flow in question and then look for 'Configuration nodes'. This is shown in the screen grab below. The configuration nodes are the OPC UA endpoint and the Modbus client objects.

Show Configuration Nodes
OPC UA
When the OPC UA Server object is exported, the following additional objects will also be exported:
-
An OPC UA endpoint object. This is a configuration object and does not appear in the working area.
-
An inject object to call a function to create the tags required by PLC Shift in the OPC UA server. This object is configured to execute once after a delay.
-
A function node that actually creates the tags in the OPC UA server. This function is called once when the associated inject node fires. This function must not be called before the OPC UA server is running.
-
The OPC UA server object itself.
-
An OPC UA client. This object connects to the server. On start, it subscribes to tag changes from the OPC UA server. After subscribing, on every message it receives about a tag value change, it publishes a message on its output.
-
A function attached to the output of the OPC UA client that is called whenever a tag value changes. This pushes the updated tag value to the global context (global.set) with the tag name as the topic. These tags can be read from the global context (global.get) by other objects by using the topic, which is the tag name.
-
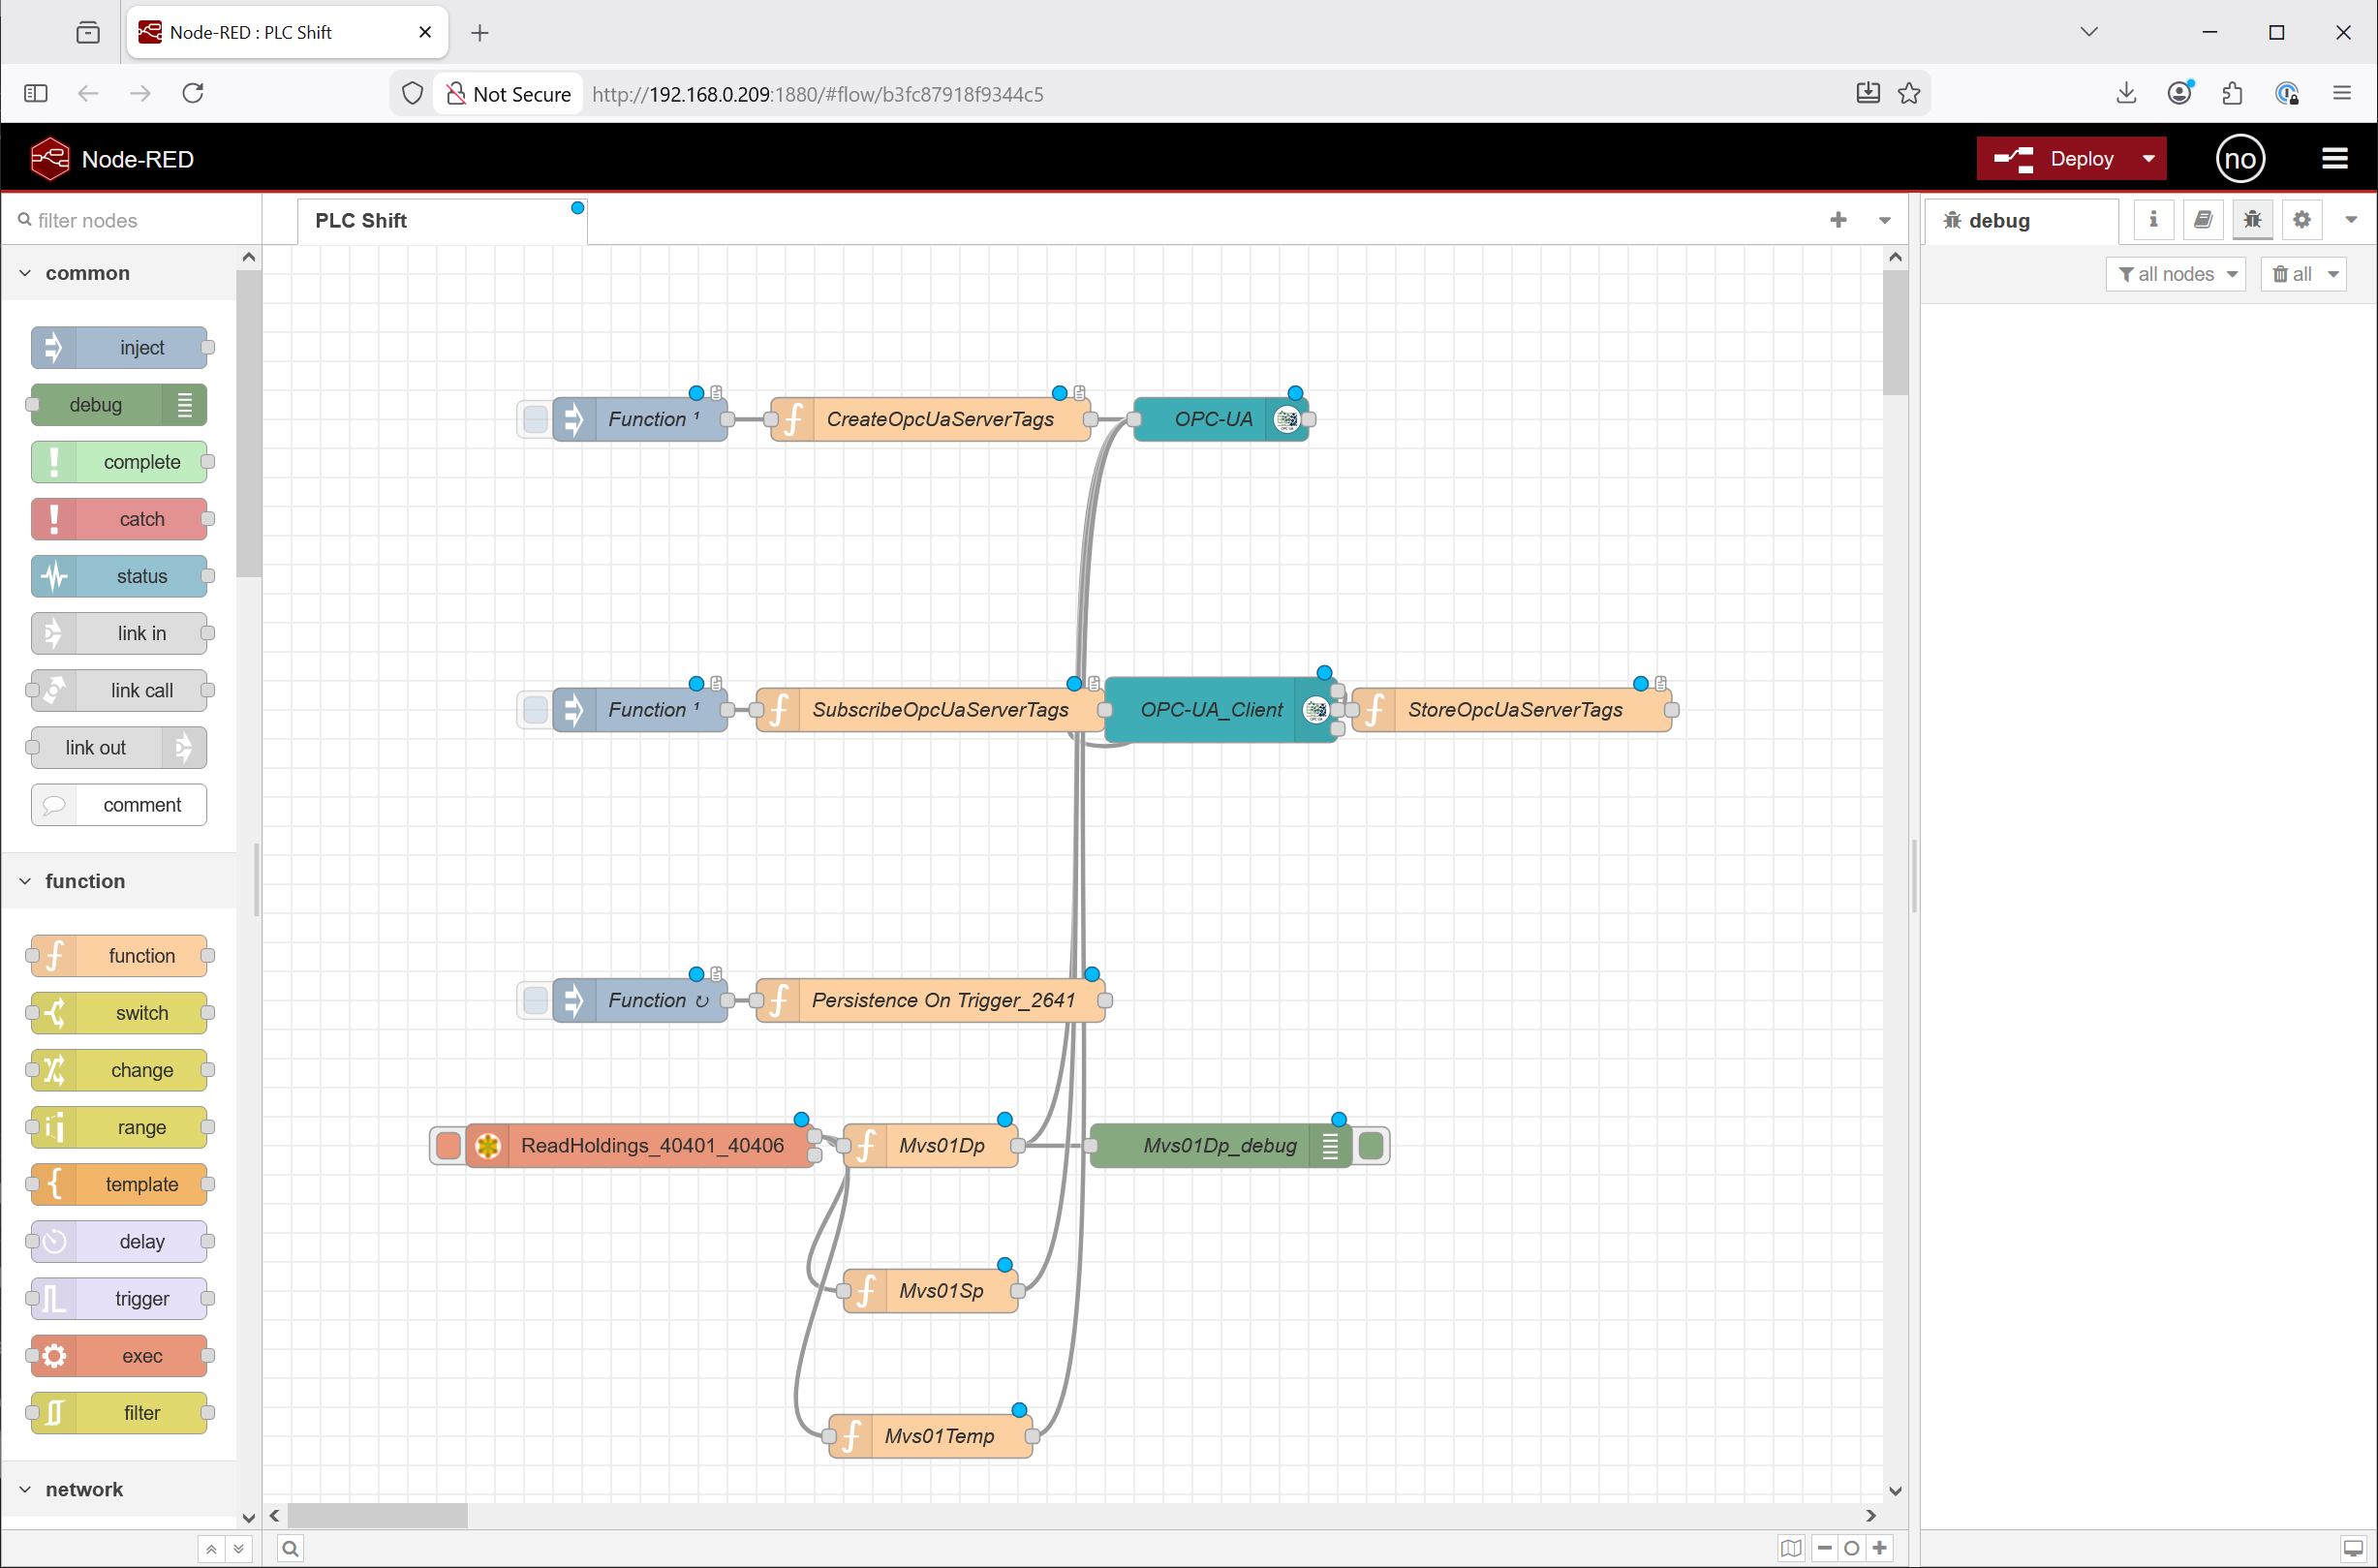
An inject object to call the function that subscribes to tag value changes from the OPC UA server. This object is configured to execute once with a delay that is twice the delay of the inject node that creates the tags in the OPC UA server. This ensures that the tags are created in the server before being subscribed to.The screen grab below shows the objects that are created when the OPC UA server object is exported from PLC Shift Manager. An OPC UA endpoint object is also created, but this is a configuration object and is not shown in the working area.
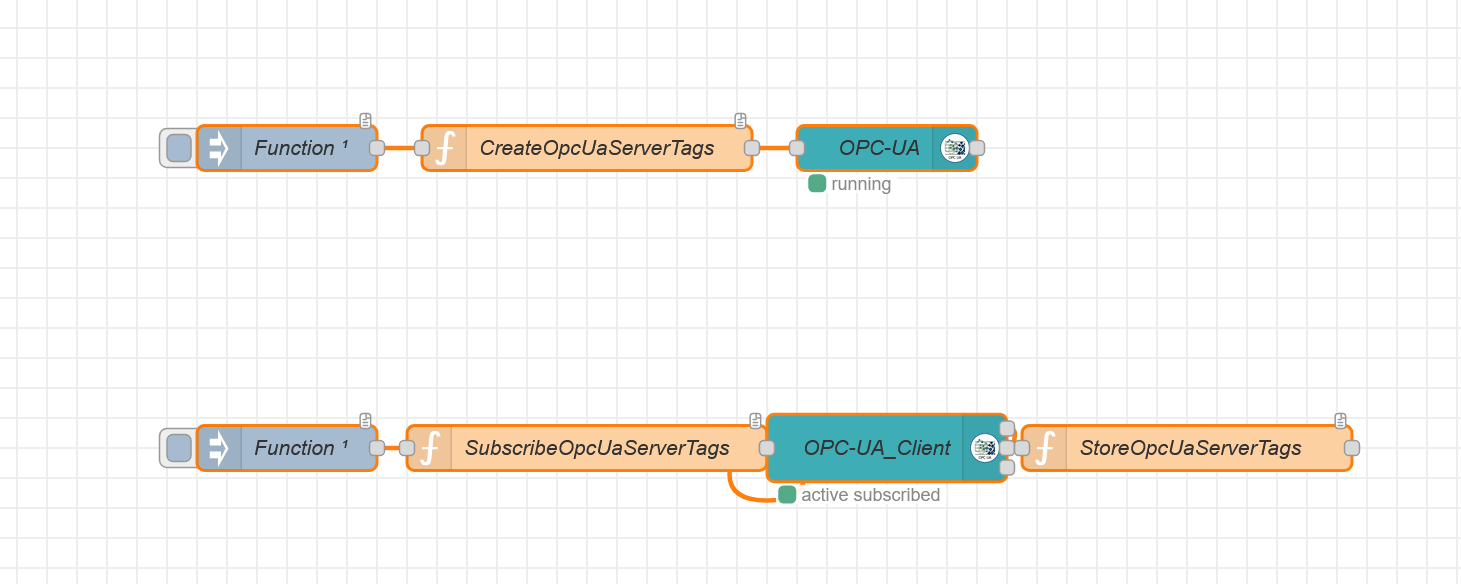 OPC UA Objects in Node Red
Changing which parameters have their 'Sync with PLC' option checked will require a new export of the OPC UA objects from PLC Shift Manager into Node Red. Specifically, the functions that are used to build tags in the server and to subscribe to tag changes are written at the time of export based on the current configuration of the apps belonging to the device. For each app, only parameters with their 'Sync with PLC' option checked are included in these functions.
Changing which parameters have their 'Sync with PLC' option checked will require a new export of the OPC UA objects from PLC Shift Manager into Node Red.
|
Ensure that no other software is using the configured port for the OPC UA server (default 4840). Codesys will sometimes listen on 4840 even if there is no project or configuration.
|
Use OPC Input Value Bool and OPC Input Value objects to move tag values from the global context into the OPC UA server. These objects give you the option of overriding the live value, and for floating point values, scaling and adding an offset is also possible.
Modbus
The Node Red implementation in PLC Shift Manager allows the creation of many types of Modbus objects. The Modbus implementation will be discussed in a general sense and not all objects will be documented here.
Modbus Connection
This is the top level Modbus object and holds configuration information for an endpoint. Both Modbus TCP and Modbus RTU (serial) connections are supported.
When using a serial connection, make sure that each physical serial port only has one corresponding connection object in Node Red. This allows that one connection object to completely manage the serial port and avoids any contention between multiple connection objects trying to share a serial port. The Unit ID and Function Code come from child objects, like Modbus Read and Modbus Write objects, so the one connection object allows you to read and write from multiple devices.
When using TCP connections, multiple connection objects can be created, as long as they all connect to different hosts. However, if connecting to a serial terminal server, where Modbus TCP is connected to Modbus RTU, use only one TCP connection object in Node Red. If multiple connection objects are used, the terminal server may have to process multiple requests at the same time. Some terminal servers can handle this, while others cannot.
Modbus Read
This is a child to the connection object and allows you to read a block of registers using function code 3 or 4. You can specify the starting address and the number of registers that are read.
Use Modbus read value objects under this object to convert raw register values to tag values. A value will always be written to the global context using the name of the object as the topic. Use an OPC Input Value object under the OPC UA server to read a Modbus value from the global context and push it into the OPC-US server, which makes it available to the PLC Shift run time.
Use an OPC UA Input Value object under the OPC UA server to move a value from the global context into the OPC UA server
|
Modbus Read Value Object Types
Modbus Read Bool
This is a child to the connection object and allows you to read a block of registers using function code 1 or 2 You can specify the starting address and the number of registers that are read.
Use a 'Modbus Read Value Bool' under this object to extract the value of a specific coil or contact. A value will always be written to the global context using the name of the object as the topic.
Modbus Write
Modbus write objects are direct children of the Modbus connection object. Select the type of object based on the Modbus value type that you want to write. Depending on the object type, options are available to scale values, apply an offset, and so on.
All Modbus write objects execute on a configurable interval. The configured tag value is read from the global context, conversions and scaling are optionally applied, and then the value is written to a coil or holding register(s) as required.
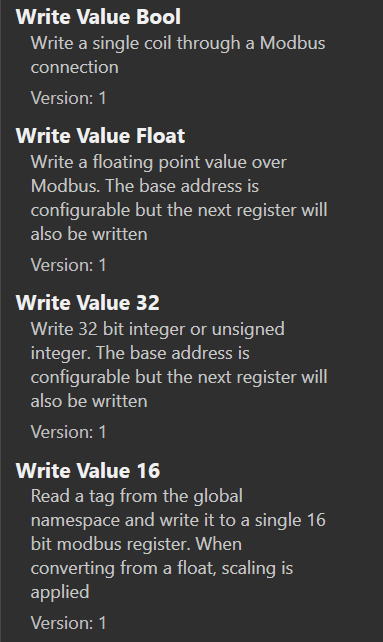
Modbus Write Object Types
Tag Formatting
In the previous sections, we have discussed tags and mentioned reading and writing tags. All tag are written in the same format, which allows interoperability between the different Node Red objects that we create using PLC Shift Manager. Values must be formatted in this way for objects to be able and read and write them.
Tags are formatted as shown below. There is a topic, which is the tag name (a string), and the value is a JSON object with 'value', 'valueType' and 'timestampUtc' fields. The 'timestampUtc' value is a always a string formatted in ISO-8601 format. The 'valueType' field is one of: 'boolean', 'number', 'string' and 'object'. The 'value' field is the actual value and must match the type as set in the 'valueType' field.
|
{
tagName : {
value: value,
valueType: valueType,
timestampUtc: timestampUtc
}
}
|
Note that values that are written directly to the OPC UA server have a different format which is shown below. This format is only used in functions where we write to the OPC UA server directly and shouldn't be used for tags in the global context.
|
// Publish to OPC UA server
msg.payload = {
namespace: 4,
messageType: "Variable",
variableName: "NodeRedOpcUa.GVL.GF01.Inputs_GF01_dp",
nodeId: "NodeRedOpcUa.GVL.GF01.Inputs_GF01_dp",
variableValue: value,
statusCode: "Good",
datatype: "Double"
};
|
Persistence
Persistence is the feature where tag values are written to disk and thus can survive restarts. To implement persistence, make sure that the required changes are made to the Node Red 'settings.js' file as discussed in the Installation section.
To make a tag value persistent, first add a 'Persistence Trigger' object under the OPC UA server object. Under the 'Persistence Trigger' object, create any number of 'Persistent Tag' objects. When the boolean tag monitored by the trigger object changes from false to true, all the persistent tags will be written to disk.
Note that tags will be written with a modified topic aka tag name. The original tag name will be used with '_Persist' appended. This makes it clear that the tag value is persistent and stored in the 'persistent' context. To get the value of the persisted tag, use the original tag name with '_Persist' appended to the name of the tag and read from the 'persistent' context.
The usual function, 'global.get(tagName_Persist, "persistent")', can be used to read a persistent tag value. Node Red will try and read the tag value from the 'persistent' context. The context must be specified in this case. If no context is specified, only the default, global context will be used.
Tags will be written to disk with the '_Persist' appended to the original name. Persistent tags can only be read by explicitly specifying the 'persistent' context.
|
Persistence should be used sparingly to avoid performance issues.
|
Additional Information
Read A Tag from the Global Context
To read a tag from the global context, create an inject node to execute at some interval, perhaps once every few seconds, and connect it to a function node. Connect the function node to the debug node. In the function node, in the 'On Message' area, paste the code below. Monitor the debug area to see the tag value.
This assumes that the tag exists in the global context. If the tag doesn't exist, a null message will be emitted.
|
// Emit the stored tag object as-is from global context
const tagName = "NodeRedOpcUa.GVL.GF01.ApplicationInfo_execCount";
const tagObj = global.get(tagName);
msg.topic = tagName;
msg.payload = tagObj ?? null;
return msg;
|
Note that this emits the entire value object. It is possible to just emit, or further process, a specific field from the value object. For example, to get just the timestamp, you can use 'tagObj.timestampUtc' in an expression.
The screen grab below shows reading the 'NodeRedOpcUa.GVL.GF01.ApplicationInfo_execCount' tag from a gas flow app once every 10 seconds. The gas flow app is running and connected to Node Red over OPC UA. It writes a new value for the execution count every second.
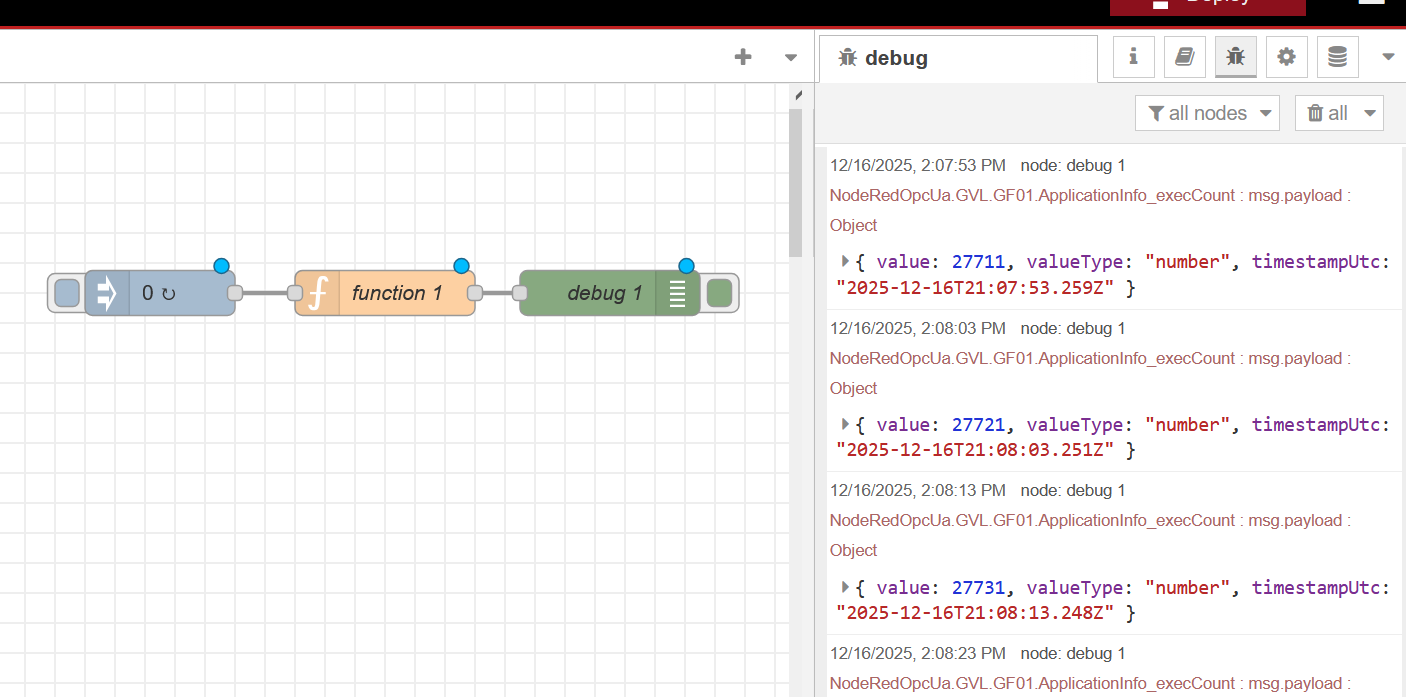
Read Execution Count for Gas Flow App from Global Namespace
Read A Tag from the Persistent Context
To read a tag from the persistent context, create an inject node to execute at some interval, perhaps once every few seconds, and connect it to a function node. Connect the function node to the debug node. In the function node, in the 'On Message' area, paste the code below. Monitor the debug area to see the tag value.
This essentially the same as reading a tag from the global context, except that in the 'get' function, we explicitly specify the 'persistence' context.
|
// Emit the stored tag object as-is from persistent context
const tagName = "NodeRedOpcUa.GVL.GF01.ApplicationInfo_execCount_Persist";
const tagObj = global.get(tagName, "persistent");
msg.topic = tagName;
msg.payload = tagObj ?? null;
return msg;
|
Write a Value Directly to the OPC UA Server
To read tags from the global context, create an inject node to execute at some interval, perhaps once every few seconds, and connect it to a function node. Connect the function node to the debug node. In the function node, in the 'On Message' area, paste the code below. Monitor the debug area to see the tag value.
|
//
// Auto-generated OPC UA value writer
//
// -----------------------------------------------------------------------------
// 1. Configure tags to write
// -----------------------------------------------------------------------------
const writeTargets = [
{
topic: "NodeRedOpcUa.GVL.LF01.Inputs_LF01_plcTemp",
dataType: "Double",
baseValue: 53.2,
noise: true
}
];
// -----------------------------------------------------------------------------
// 2. Build outgoing OPC UA write requests
// -----------------------------------------------------------------------------
let msgs = [];
for (const t of writeTargets) {
let value = t.baseValue;
// Add optional noise (±0.5%)
if (t.dataType === "Double" && t.noise === true) {
const noiseFactor = 1 + ((Math.random() - 0.5) * 0.01); // ±0.5%
value = value * noiseFactor;
}
msgs.push({
topic: t.topic,
payload: {
namespace: 4,
messageType: "Variable",
variableName: t.topic,
nodeId: t.topic,
variableValue: value,
statusCode: "Good",
datatype: t.dataType
},
// Optional diagnostic metadata (useful for debug nodes)
valueType: t.dataType,
timestampUtc: new Date().toISOString(),
baseValueApplied: t.baseValue,
noiseApplied: t.noise ?? false
});
}
// Emit multiple messages
return [msgs];
|
This sets the 'NodeRedOpcUa.GVL.LF01.Inputs_LF01_plcTemp' tag in the OPC UA server. The value is the base value plus some random noise. It's possible to enter an array of tags in the top and have them all get written. This is more complicated than the 'Read A Tag' example above, but shows more of what's possible.
Note that the output message is in the specific format required by the OPC UA server. This is not in our common tag format.
Deployment in Production
When deploying a Node Red system in production, the following rules should be observed:
-
Make sure that no browser is connected to the runtime. This uses quite a bit of computing power and communications resources on the device where the runtime is installed.
-
Delete (not just disable) all debug objects.
-
Execute the 'disable-editor-nr-plc-shift.sh' script which can be found in the PLC Shift deployment bundle. This modifies the Node Red 'settings.js' file and sets the 'disableEditor' option to 'true' and restarts the Node Red service. This completely removed the ability to view or update the system using a browser. This is a secure approach, and also prevents inadvertent changes to the system. Run the 'enable-editor-nr-plc-shift.sh' script to reverse this and set 'disableEditor' to 'false'. Do not run this script with 'sudo' because that changes the current user to root and modifies a file in the root user's home directory, which is not the current user's home directory.
Do not run the editor enable or disable scripts with 'sudo'.
|
Additional Diagnostics
If you're experiencing issues with Node Red, especially around resource consumption, memory leaks and so on, we have a js function that allows you to collect additional information from the Node Red process. Metrics are collected once per second and aggregated in minute, hour and day values. Metrics are captured in the systemd journal and can be accessed using the 'journalctl' command. For example, to tail Node Red logs, use the command: sudo journalctl -f -u nodered.service
Because of sandboxing and security in the Node.js runtime, the function will not run until some settings in Node Red are relaxed. The download bundle contains bash (or ash for Sp47xi) scripts that allow you make these required changes. Make sure to run the script before trying to use the js function. Running the script will modify your 'settings.js' file and restart the Node Red service.

Enhanced Diagnostics Bundle Contents
Use the 'journal-to-csv' script to export data from journald to a CSV file. This makes is easy to analyze the generated data.