Quick Start Guide
This section explains how to get started with PLC Shift.
Prerequisites
To complete this section, you’ll need the following:
-
A computer running Windows 10 or 11. PLC Shift Manager will be installed on this computer.
-
A computer running a supported version of Linux where you have superuser access. Supported devices and operating systems are listed here.
-
A supported PLC along with associated configuration software. This is optional and only required to test PLC integration. Applications will run and can be tested without a PLC.
Initial Set Up
-
Install PLC Shift Manager on the Windows PC. The download link can be found on our website.
-
Do a clean install of Linux on your hardware. This is an optional step but ensures that we are starting with a clean system.
-
Enable SSH on the device. This may already be enabled. Note which port that SSH service will listen on. Port 22 is the default.
-
Obtain credentials for a superuser account on the device. The default account likely has superuser privileges.
-
Enable the network to the remote device so that communications are possible between the Windows PC and the device.
-
Note the device’s IP address.
-
Set the time zone and clock on the device. This is an optional step but is always good practice.
Check out the 'Useful Commands' section first.
|
The Sensia HCC2 does not allow users to have root (superuser) access and it also does not allow SSH. To deploy to HCC2, see the instructions in the Deploy Runtime on Sensia HCC2 section below.
|
Create Devices and Applications
-
Right click the ‘System’ node and select the 'Create New Device' option.
-
Rename the device if you want. We’ll use the default name 'device'.
-
Right click the newly created device and create a new gas flow application at version 1.4 with the name ‘GF01’
-
The tree view should look like the screen grab below.
 Create Devices and Applications
Configure Gas Flow GF01
-
Click the check box next to 'GF01' in the tree view. This will open the details for the application and the parent device.
-
Click the 'GF01' tab at the bottom on the application window to put the application’s configuration into focus.
-
Select the 'Overall Settings' group from the list of groups on the left side of the working area.
-
Click the check box next to the 'Application Tag Name Prefix' parameter. This will open a new area that will allow you to change the value.
-
Change the value to 'GF01_'. All tags in the app except user defined tags will now be prefixed with this value.
 Change App Tag Name Prefix
 -
Click the ‘Compressibility’ group to bring parameters for that group into focus.
-
Click the ‘Sync All with PLC’ button. This will make all parameters on this group available when online and will synchronize the values of these tags with the PLC.
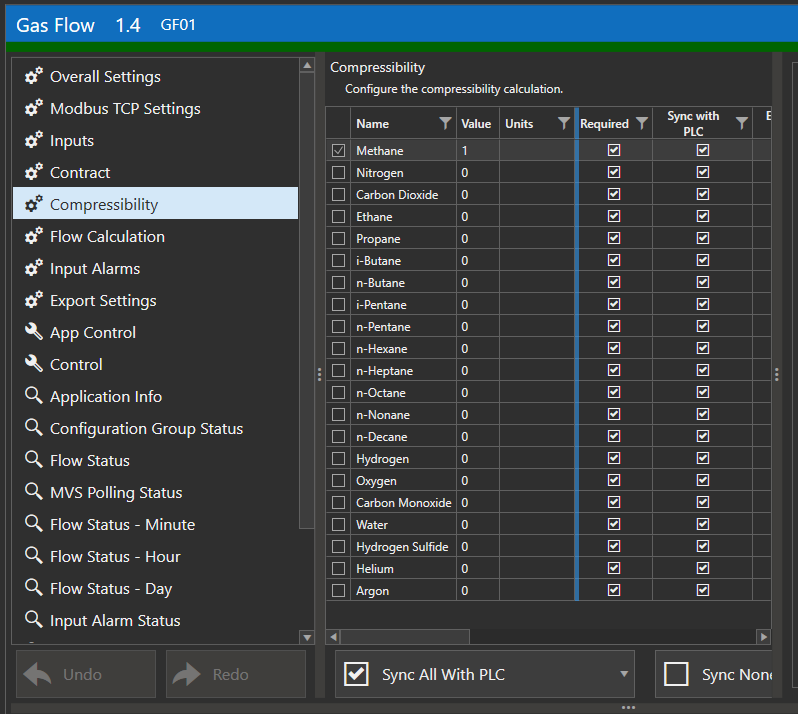
Sync All Parameters in the 'Compressibility' Group
Configure Device
-
Click the 'device' tab at the bottom of the application window to put the device’s configuration into focus. This tab will be labeled with whatever you named the device.
-
Configure the 'Host Name' parameter with the remove device’s IP address.
-
Configure the 'SSH Port' parameter if required. This is likely not required because the default value is probably correct. On Sensia HCC2 and Weidmuller UC20-M400, this will be '2222'.
-
Configure the 'SSH User Name' parameter with the username of the account that you want to use to SSH into the remote device. This user must have superuser privileges. On Sensia HCC2 and Weidmuller UC20-M4000, this will be 'plc-shift-user'
-
Configure the 'SSH Authentication Type' and 'SSH Public Key Filename' settings if you are using key based authentication. To get started, password based authentication is recommended.
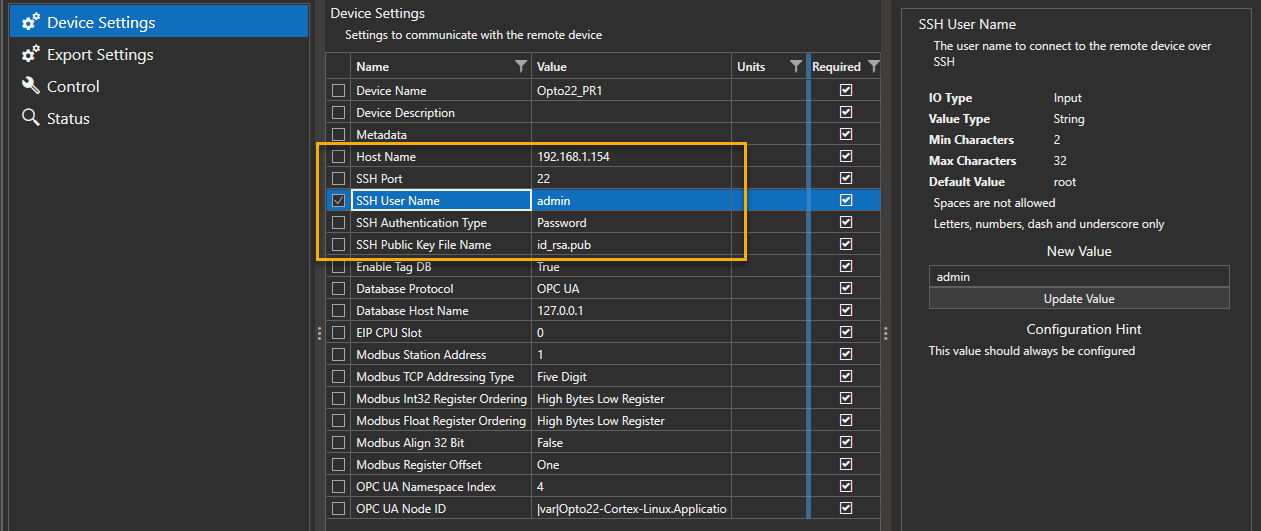
Device SSH Settings
Deploy Runtime
Use these instructions for Linux devices where you have root access over SSH. Do not use these instructions for containerized devices like the Sensia HCC2. For HCC2, use the instructions in the Deploy Runtime on Sensia HCC2 section below. For Weidmuller UC20-M4000, use the instructions in the Deploy Runtime on Weidmuller M4000 section below.
-
Click the ‘Synchronize’ tab at the bottom on the application window.
-
If you are using password based authentication, enter the password for the configured user in the ‘Password’ field.
-
Select the type of hardware and operating system that you are targeting using the ‘Select Hardware’ drop down.
-
Click the ‘Copy Files to Device’ button. This will copy scripts and executable files to the home directory of the configured user. This does not install any software, it only copies files.
-
Check the communication log area to the right of the controls to see if the action was successful. The screen grab below shows failures due to 2 different reasons (bad password and wrong OS).
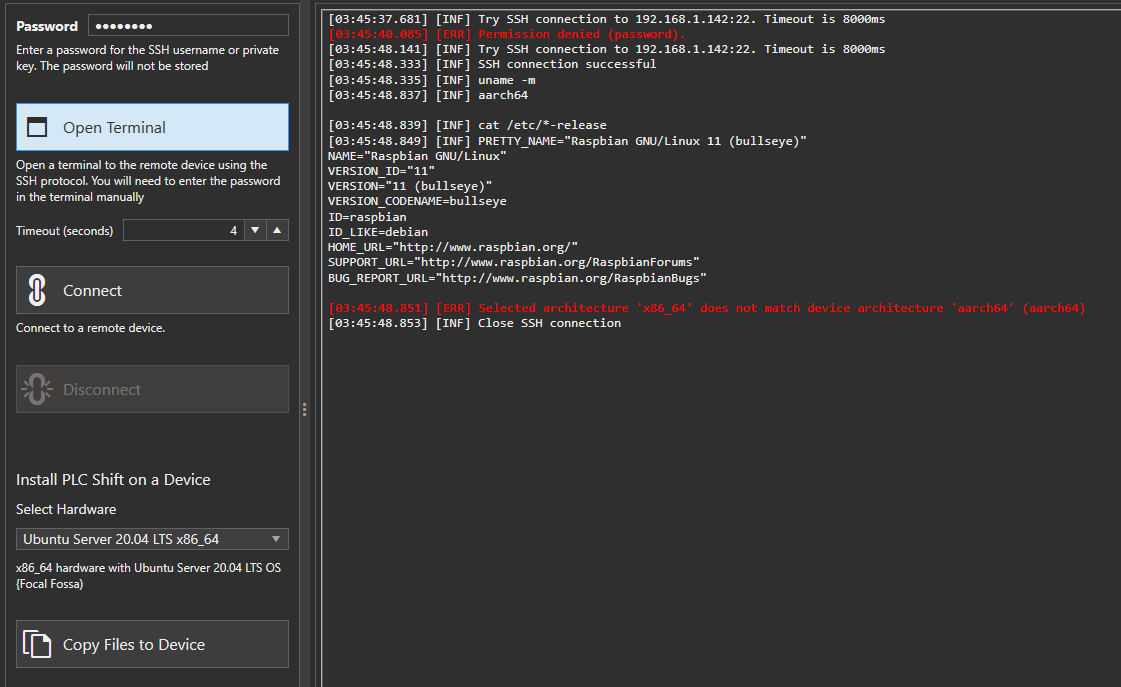 Copy Files Failures
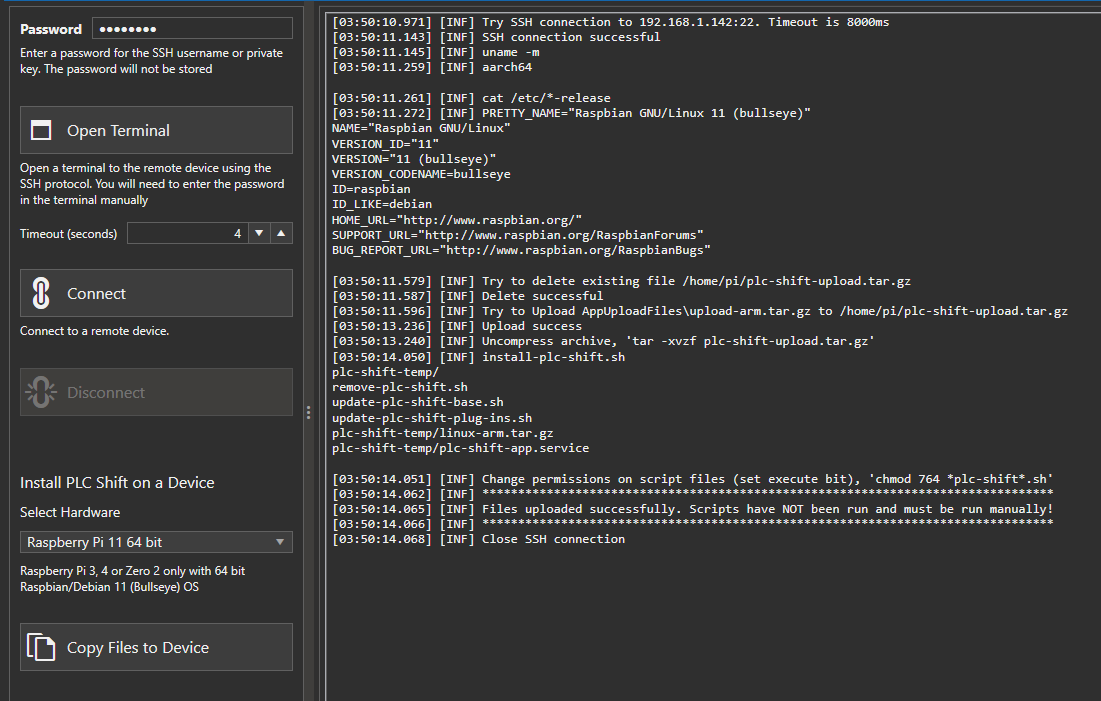 Copy Files Success6. Once files are successfully copied to remote device, click the 'Open Terminal' button. This will open a new window and call SSH. Enter your password if required.7. For non-SCADAPack devices: You should be in the user’s configured home directory. If not, change to the configured user’s home directory. The directory listing should match the one shown below. For SCADAPack, as of version 1.32 (Feb 2024), files are copied to the '/mnt/data/user_data/plc-shift-deploy' directory. Switch to this directory to see a directory listing like the one below.
 Deployment Files on Device
8. Run the installation script: sudo ./install-plc-shift.sh
9. The script will install the .net Core runtime and PLC Shift program files. Your window will likely not look exactly like the one below.
Internet access is not required to deploy the PLC Shift runtime. It can be done completely offline.
|
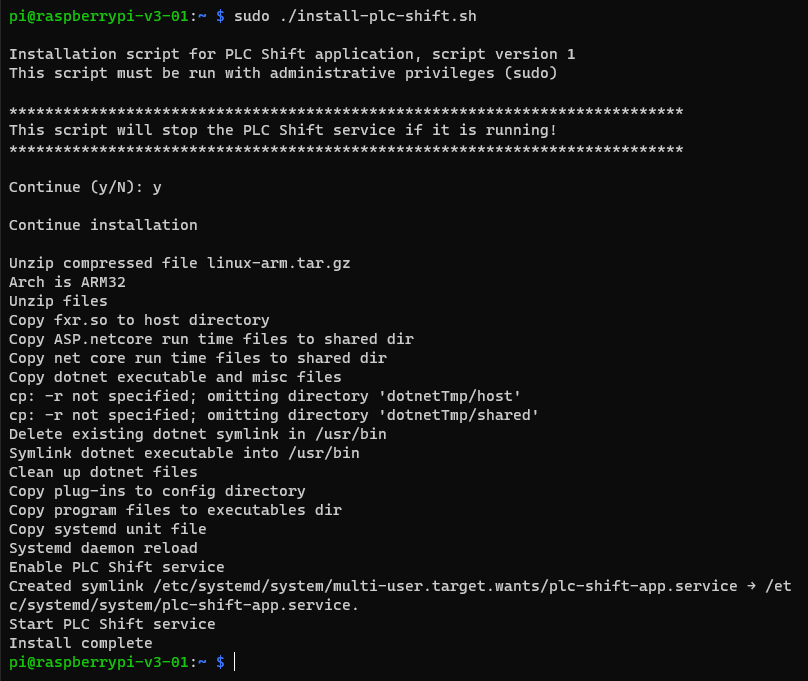
Installation Script
Copy Files Manually
For various reasons, copying files automatically does not always work. When this occurs, copying deployment files manually to the target is option, but extra care must be taken to make sure that the correct bundle is deployed.
Do not use these instructions for containerized devices like the Sensia HCC2. For HCC2, use the instructions in the Deploy Runtime on Sensia HCC2 section below.
When copying files manually, take care that the correct bundle is copied.
|
Follow the instructions below to copy files to the target manually.
1. Deployment bundles are located in the 'C:\Users\<username>\AppData\Local\Programs\PLC Shift Manager\AppUploadFiles' directory, where <username> is your actual username.
2. Locate the bundle for your target hardware
-
'upload-arm.tar.gz' supports 32 bit (armv7l) ARM systems. This includes 64 bit Raspberry Pi processors like Pi4.
-
'upload-arm64.tar.gz' supports 64 bit (aarch64) ARM systems.
-
'upload-opto22-34.tar.gz' support Opto-22 EPIC and RIO.
-
'upload-sp470i.tar.gz' supports SCADAPack 47xi.
-
'upload-x64.tar.gz' supports AMD 64 bit devices like desktop computers, Intel Atom and others.3. Copy the bundle to the home directory of the user who you will run the deployment scripts as to the target hardware using scp, sftp, or some other mechanism.4. Unzip the archive by running this command on the traget hardware: tar -xvf <filename>, where <filename> is the actual file that you copied in the previous step.5. Make the scripts executable by running this command: sudo chmod 764 *plc-shift*.sh.
From this point, you can follow the steps in the previous section starting with running the installation script.
Deploy Runtime on Sensia HCC2
Sensia HCC2 does not allow users to connect via SSH, and does not allow users to have root (superuser) access. HCC2 also only executes containerized applications.
Follow the instructions below to deploy the PLC Shift Runtime to the Sensia HCC2.
-
Download and install Sensia's Edge Package Manger (EPM) tool for windows, or connect your HCC2 to Mender.io.
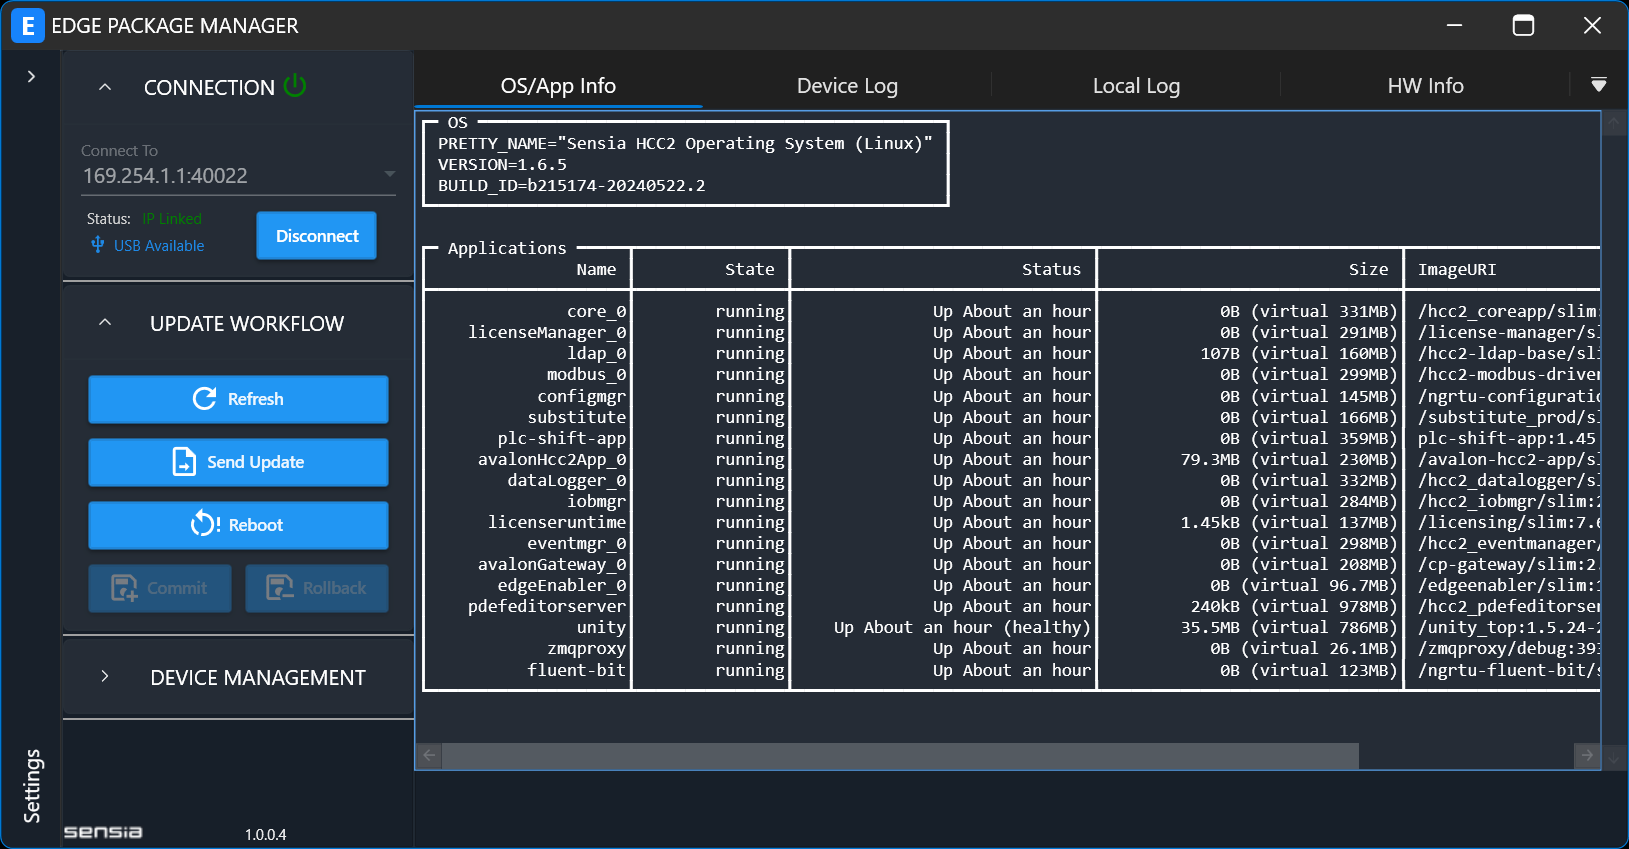 Sensia EPM After PLC Shift Runtime Installation
 -
Download the .mender PLC Shift deployment package from the PLC Shift Download link on our website. Each mender file contains a signed docker container that contains a specific version of the PLC Shift Runtime. For example, the file 'plc-shift_1.45.mender' contains a signed container with the PLC Shift runtime at version 1.45 along with a set of application plug ins.Note that containers are immutable, and neither the runtime nor plugins can be updated in the container. To install a new version, of the runtime, or to get newer plugins, the current container must be deleted and a new container must be installed.
Containers are immutable, and neither the runtime nor plugins can be updated in a container.
|
3. If installing PLC Shift version 1.53 or older, obtain and apply a license from Sensia for the PLC Shift runtime. As of August 2024, this is the development license, which is also called the 'Edge HCC2 SDK Dev License'.

Edge HCC2 SDK Dev License Installed on the HCC2
4. If installing PLC Shift version 1.55 or newer, load the 'keys-Reverity-710-signed.mender' file onto the HCC2 using EPM. This file is available at the download link. This file is signed by Sensia and allows the HCC2 to verify that the PLC Shift release was signed by Reverity.
5. Use EPM or mender.io to install the PLC Shift Runtime package on the HCC2. IN EPM, use the 'Send Update' button and choose the package that you want to install.
6. Open port 2222 in the HCC2 firewall. Firewall settings can be found under Deploy->Device->User Firewall Port menu in Unity Edge. The PLC Shift runtime container has an SSH server which listens on port 2222.
7. Connect to the container using SSH: ssh plc-shift-user@<hcc2>, where <hcc2> is replaced with the HCC2's hostname or IP address. The default credentials for the SSH server in the PLC Shift runtime container are: plc-shift-user/plc-shift-user. Put another way, the username is 'plc-shift-user' and the password is 'plc-shift-user'.
8. Once an SSH connection has been established, change the default password. This is critically important to creating a secure installation! The password only needs to be changed once. The change will be persistent through container restarts and replacements.
The default SSH password for the container MUST be changed.
|
To enhance security, consider closing port 2222 in the HCC2 when the initial configuration is complete and you don't anticipate connecting with PLC Shift Manager anymore.
|
At this point, the runtime is deployed on the HCC2 and you should be able to connect as if it was any other Linux device. Move on to the 'Application Download and Testing' section below.
Deploy Runtime on Weidmuller M4000
Weidmuller UC20 devices, including the M4000, must use a containerized solution. On UC20 devices, docker containers are managed using Portainer, which is available from the device's App Manager. Portainer is not installed by default, so start by installing and configuring Portainer on the device by following Weidmuller's manual.
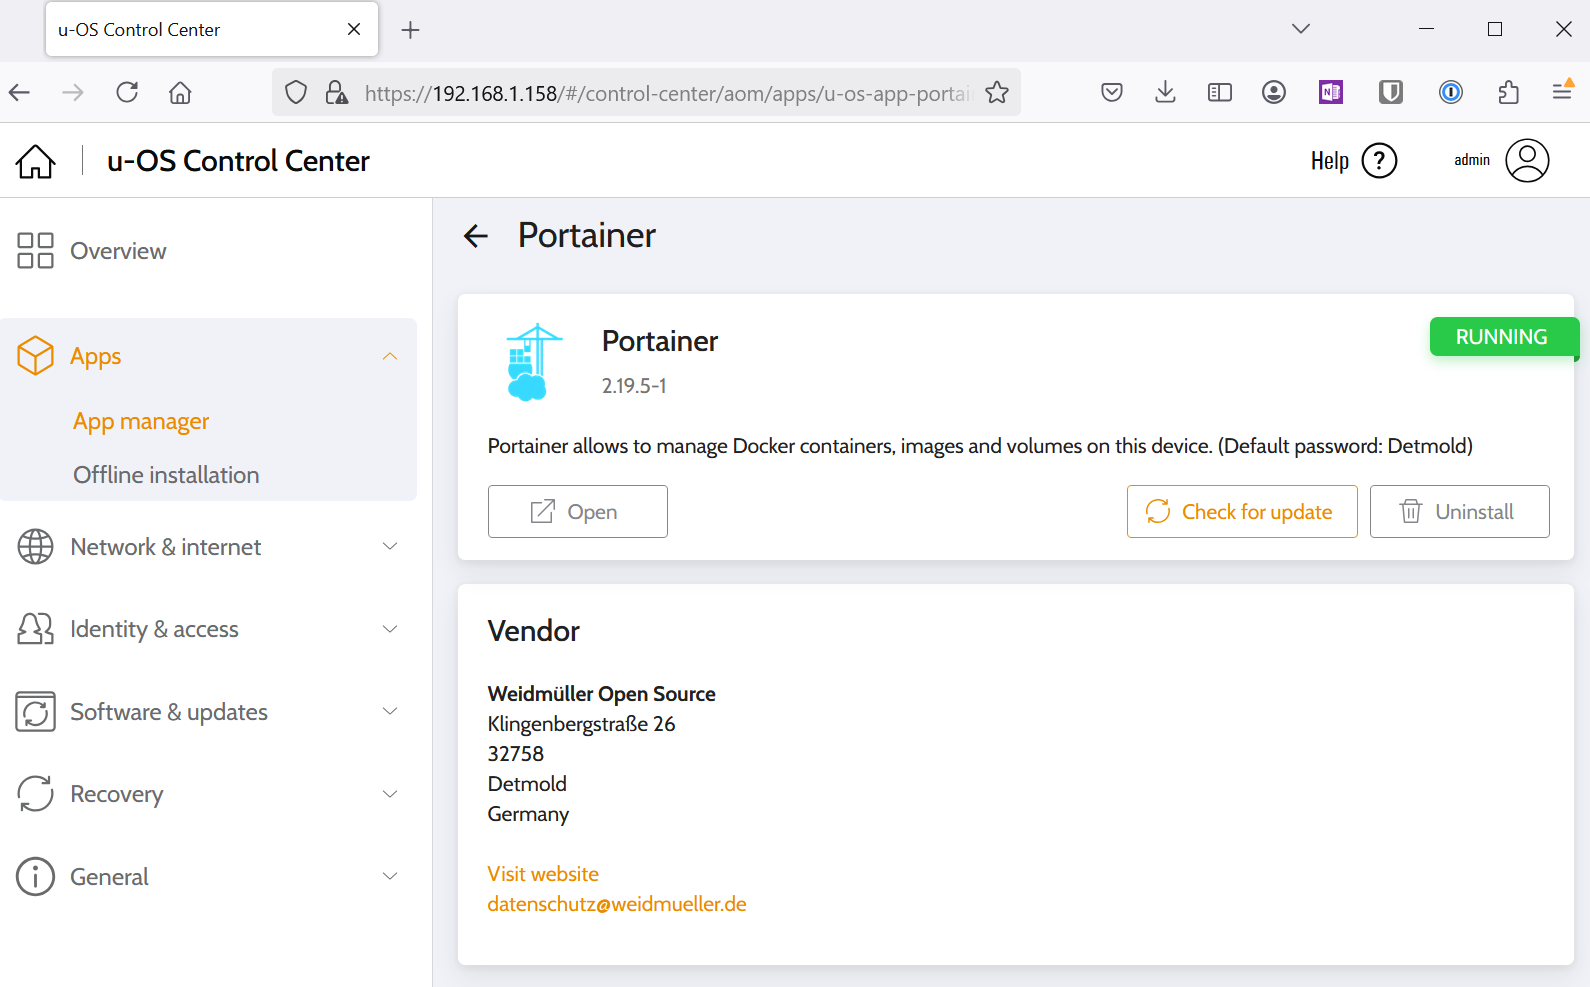
u-OS Control Center, Install Portainer
Follow the instructions below to load a PLC Shift runtime image on your M4000 device.
Add Reverity Container Repository
-
Open the Portainer UI and click 'Registries' from the menu on the left side.
-
Click the '+Add Registry' button.
 Portainer Registries UI
 -
Select the 'Custom Registry' button.
-
The settings are:
-
Name = Reverity
-
Registry URL = containers01.reverity.io:4999
-
Authentication = true
-
Username = admin
-
Password = Detmold5. Click the 'Add Registry' button. The custom registry will be created.
 Portainer, Create Reverity Container Registry
Download an Image
Follow the instructions below to pull a container image from Reverity's docker repository to the M4000. Internet access on the M4000 is required to pull the image directly. If the M4000 does not have internet access, Portainer's 'Import' feature can be used to load the container image.
Online
-
Click the 'Home' button in the left menu bar.
-
In the UI that opens, click somewhere in the primary environment. This opens up a new menu on the left with the 'Dashboard' option selected.
-
In this new, environment specific menu, select the 'Images' option.
-
In the 'Registry' drop down, select the 'Reverity' registry.
-
Enter a container name. Containers for the M4000 are named like so: plc-shift-app-linux-arm64:x.y, where x is the major version of the release and y is the minor version. For example, to download the PLC Shift runtime container at version 1.65, set the image to: plc-shift-app-linux-arm64:1.65.PLC Shift support for the Weidmuller UC20-M4000 support starts with version 1.65 (February 2025).6. Click the 'Pull the Image' button. This downloads the container image to the device.
 Portainer, Download the PLC Shift Runtime ImageOffline
 -
Find the image that you want to install and download it to your computer. This will be a compressed archive (.tar.gz). The download link can be found on our website.
-
In Portainer, click the 'Home' button in the left menu bar.
-
In the UI that opens, click somewhere in the primary environment. This opens up a new menu on the left with the 'Dashboard' option selected.
-
In this new, environment specific menu, select the 'Images' option.
-
In the list of images, click the 'Import' button. This opens a new page where you can copy the file from your computer to the M4000.
-
In the 'Registry' drop down, select the 'Reverity' registry.
-
Give the image a name. You can name it whatever you like, but we recommend staying with Reverity's naming convention. Containers for the M4000 are named like so: plc-shift-app-linux-arm64:x.y, where x is the major version of the release and y is the minor version. For example, to download the PLC Shift runtime container at version 1.65, set the image to: plc-shift-app-linux-arm64:1.65.
-
Click the 'Select File' button and select the file that you downloaded previously.
-
Click the 'Upload' button. The file will be copied to the M4000 and tagged for use with Docker. Later on, when you go to create the container, you can select this image and Portainer will not attempt to pull the image from the repository and will use the cached image instead.Note that upload page doesn't always indicate a successful upload, and the spinner om the 'Upload' button keeps spinning even after the upload is complete. If you navigate away from the upload page back to the 'Images' page you should see the image there. However, if you navigate away from the page too quickly the upload will not finish.
 Portainer, Image Import
Create the Container
Follow the instructions below to create a container from the previously downloaded image. You can run multiple instances of the container, but there is usually no need to do. A single container allows you run multiple apps. If you choose run multiple containers, make sure to assign a unique port for SSH. The first container could use 2222, the next 2223, and so on. -
From the environment specific menu on the left side of the Portainer UI, select the 'Containers' option.
-
Click the '+Add container' button on the top right side of the new page that is loaded.
-
Make the following changes:
-
Name = plc-shift-app-linux-arm64_x_y, where x is the major revision and y is the minor revision.
-
Registry =Reverity
-
Image = plc-shift-app-linux-arm64:x.y
-
Always pull the image = false.
-
Click the '+ publish a new network port' button and map external port 2222 on the device to port 22 in the container. This allows PLC Shift Manager to connect to the runtime over SSH on port 2222.4. Click the 'Deploy the container' button..
 Portainer PLC Shift Container ConfigurationThe container will be created quickly because we already downloaded the image.
Additional Information
Once the container is deployed on the UC20-M4000, you can access it over ssh: ssh plc-shift-user@<hostname> -p 2222. The default password is 'plc-shift-user' and must be changed after the initial logon. The port is set to 2222 to not conflict with the SSH server at port 22 on the M4000.
The default SSH password for the container MUST be changed.
|
When connecting with PLC Shift Manager, make sure to update the SSH port in PLC Shift Manager to 2222. The default is 22.
The UC20-M4000 uses Codesys as its programming environment. Follow the instructions in the CODESYS OPC-UA section to integrate with the PLC programming environment. When configuration the connection to CODESYS over OPC-UA, use one of the M4000's external facing IP addresses.
Application Download and Testing
-
In PLC Shift Manager, click the ‘Connect’ button.
-
If the application run was successfully installed, you will see a screen like the one below.
 Synchronize Screen
3. Click the 'Download' button. This will write the local configuration to the remote device. The GF01 application will start execution on the remote device.
4. Click the 'GF01' tab at the bottom on the application window to put the application’s configuration into focus.
5. Select the 'User Defined Tags' tab.
6. Update the user defined values so that they are not null. Normally these values would be read from the PLC, but there is no PLC, so we must set the values manually.
-
Check the 'Differential Pressure Tag Name' parameter in the grid and enter a new value of 100 to the right of the grid. Click the 'Update Value' button.
-
Check the 'Static Pressure Tag Name' parameter in the grid and enter a new value of 10 000 to the right of the grid. Click the 'Update Value' button.
-
Check the 'Temperature Tag Name' parameter in the grid and enter a new value of 75 to the right of the grid. Click the 'Update Value' button.
 Set User Defined Values
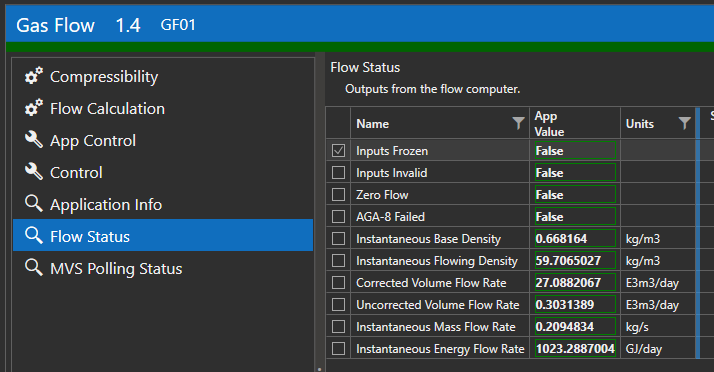
 Flow StatusThe PLC Shift runtime is deployed and one application is configured and running. Required input values have been set manually, but input values would normally come from the PLC. Follow the steps below to integrate with your PLC.
PLC Integration
Once the PLC Shift runtime is deployed and the GF01 app is running, follow the steps below to integrate the app with the a PLC.Configure the PLC
Use the PLC specific instructions to create tags or objects for the GF01 application in the PLC for the PLC that you have on hand. -
For Rockwell Automation Logix PLCs, follow the instructions in the 'Logix EthertNET/IP' section.
-
For Modbus PLCs, follow the instructions in the 'Modbus' section. Tags will have to be created and configured in the controller manually when using Modbus.
-
For CODESYS PLCs using OPC-UA, follow the directions in the 'CODESYS OPC-UA' section.
-
For Schneider Electric SCADAPack 470i/474i RTUs follow the directions in the 'SCADAPack 47xi' section.
-
For Sensia HCC2 devices, follow the directions in the Sensia HCC2 section.
Configure Device and Application
In the PLC Shift Manager, perform the actions listed below, depending on which PLC you are using.Rockwell Automation Logix using EtherNET/IP
-
Select the device configuration.
-
Select the 'Device Settings' group.
-
Change the value of the 'Enable Tag DB' parameter to true.
-
Change the value of the 'Database Protocol' parameter to ‘EIP’.
-
Enter the IP address of the PLC in the 'Database Host Name' parameter.
-
Change the value of the 'EIP CPU Slot' parameter if required.
 Logix PLC Settings
 -
Select the configuration for the 'GF01' application.
-
Select the 'Overall Settings' group.
-
Change the value of the ‘PLC Tag Name’ parameter to 'GF01'.10. Select the 'Synchronize' tab, connect the PLC Shift runtime, and download the updated configuration.11. Monitor the 'GF01' tag in Studio 5000. Verify that the status values in Studio 5000 match values in PLC Shift Manager.
 Application Info in Studio 5000 and PLC Shift Manager
Generic Modbus Controller
-
Select the device configuration.
-
Select the 'Device Settings' group.
-
Change the value of the 'Enable Tag DB' parameter to true.
-
Change the value of the 'Database Protocol' parameter to ‘Modbus’.
-
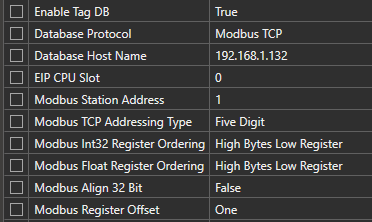
Configure the Modbus settings shown in the screen grab below. The specific settings will depend on the controller that you're using.
 Modbus Settings6. Select the 'Synchronize' tab, connect the PLC Shift runtime, and download the updated configuration.7. Monitor the Modbus registers allocated to the 'GF01' app in your PLC programming software. Verify that the status values in your PLC programming software match values in PLC Shift Manager.
CODESYS PLC Using OPC-UA
-
Select the device configuration.
-
Select the 'Device Settings' group.
-
Change the value of the 'Enable Tag DB' parameter to true.
-
Change the value of the 'Database Protocol' parameter to ‘OPC UA’.
-
Enter the IP address of the PLC in the 'Database Host Name' parameter.
-
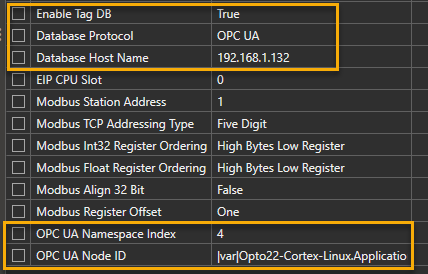
Change the value of the 'OPC UA Namespace Index' and 'OPC UA Node ID' parameters as required to match your controller settings. If using Opto 22 PR1 or PR2 controllers, the default values should be fine.
 OPC-UA PLC Settings
 -
Select the configuration for the 'GF01' application.
-
Select the 'Overall Settings' group.
-
Change the value of the ‘PLC Tag Name’ parameter to 'GF01'.
-
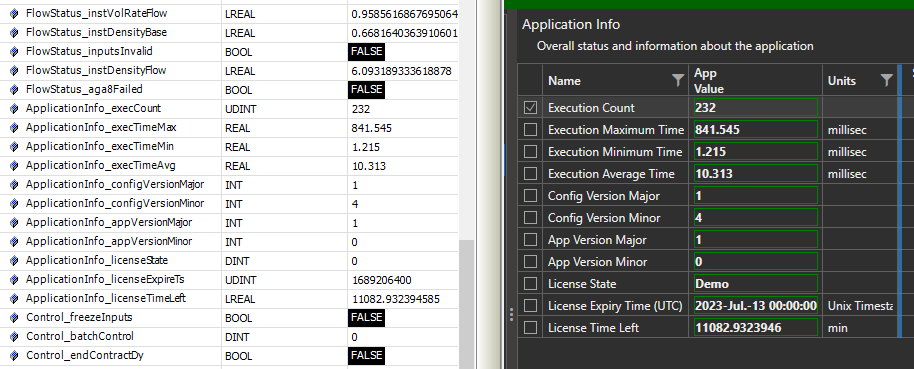
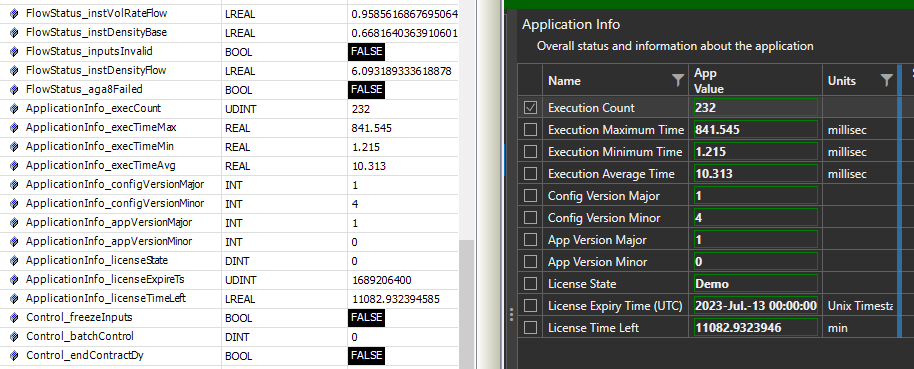
Set the value of the 'OPC UA Global Variable List Name' parameter if required. The default value of 'GVL' matches the default GVL name in CODESYS.11. Select the 'Synchronize' tab, connect the PLC Shift runtime, and download the updated configuration.12. Monitor the 'GF01' tag in CODESYS. Verify that the status values in CODESYS match values in PLC Shift Manager.
 Application Info in CODESYS and PLC Shift Manager
SCADAPack 470i/474i
-
Select the device configuration.
-
Select the 'Device Settings' group.
-
Change the value of the 'Enable Tag DB' parameter to true.
-
Change the value of the 'Database Protocol' parameter to ‘SP47xi’.
-
Enter '127.0.0.1' in the 'Database Host Name' parameter.
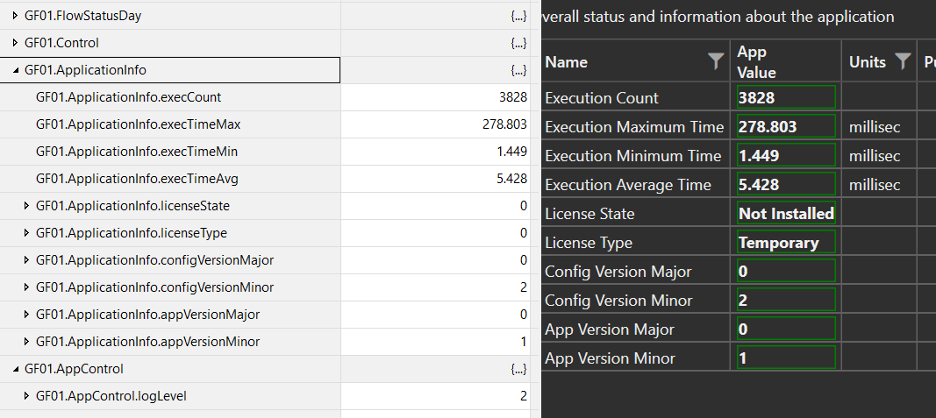
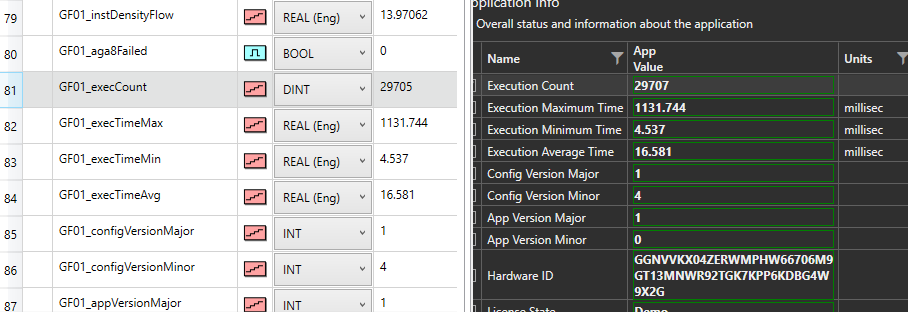 SCADAPack 47xi PLC Settings6. Select the 'Synchronize' tab, connect the PLC Shift runtime, and download the updated configuration.7. Monitor the 'GF01' objects in Remote Connect. Verify that the status values in Remote Connect match the values in PLC Shift Manager.
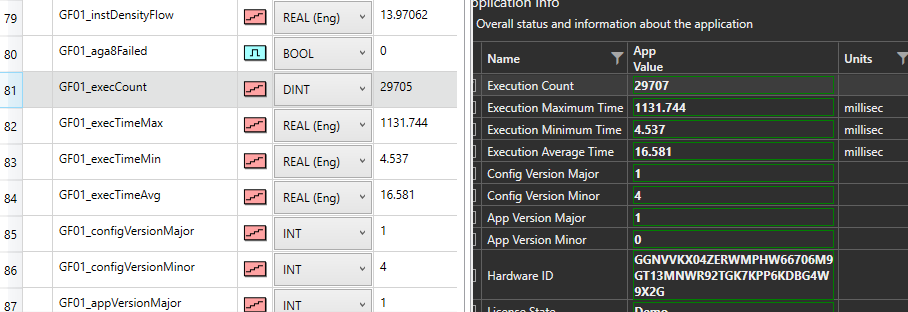
 Application Information in Remote Connect and PLC Shift Manager
Sensia HCC2
-
Select the device configuration.
-
Select the 'Device Settings' group.
-
Change the value of the 'Enable Tag DB' parameter to true.
-
Change the value of the 'Database Protocol' parameter to ‘Modbus’. This is the default value.
-
Enter 'modbus_0' in the 'Database Host Name' parameter.
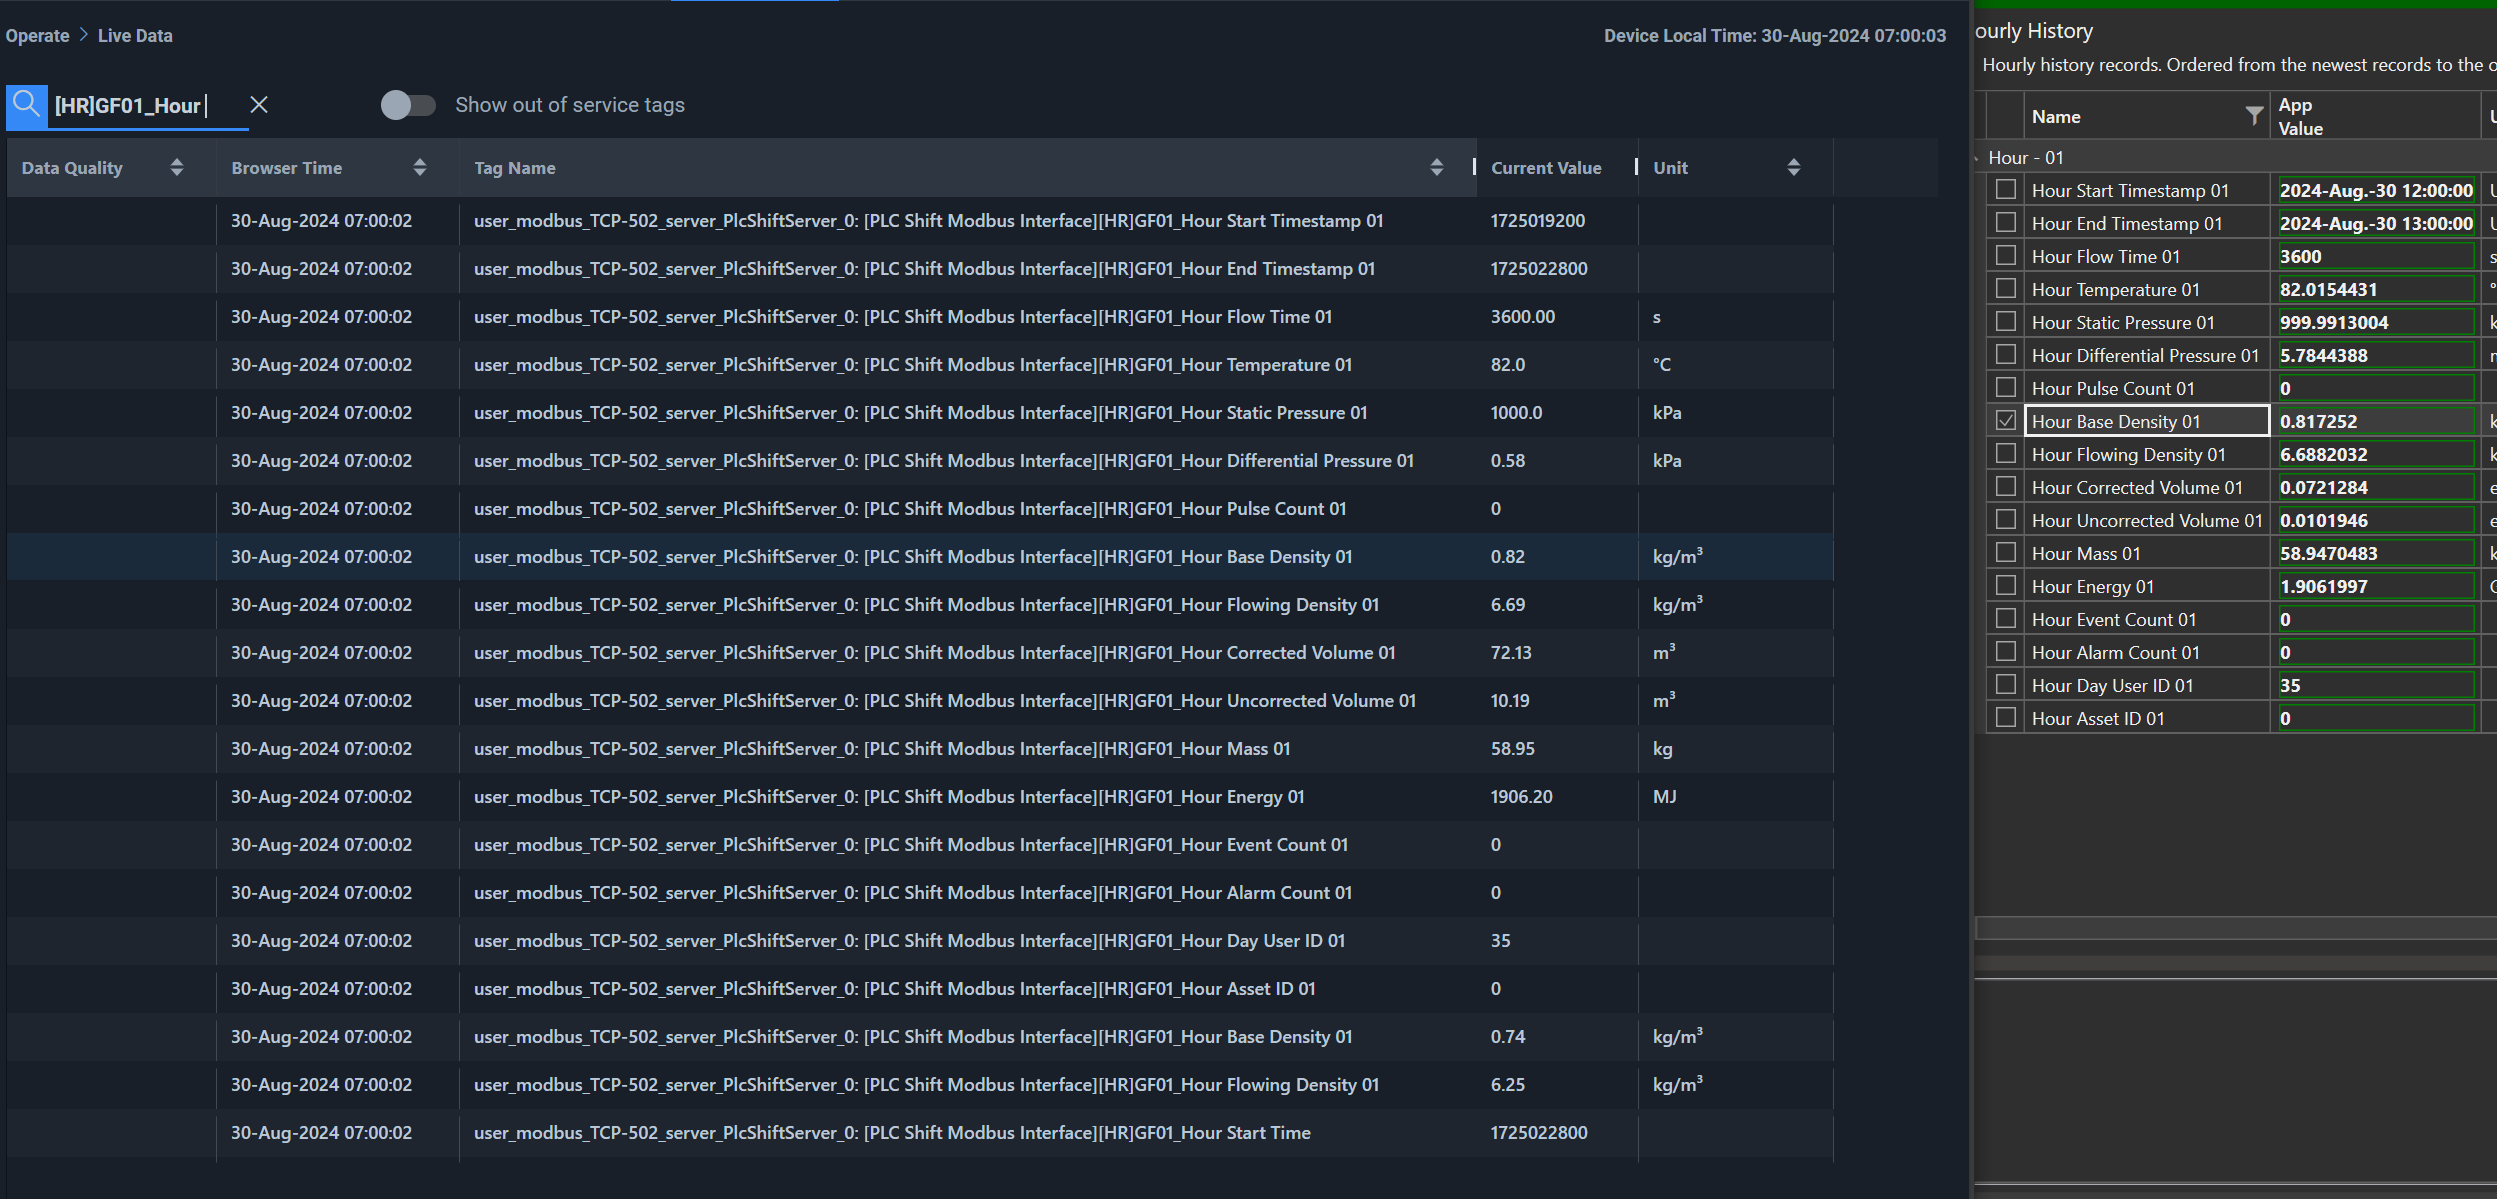
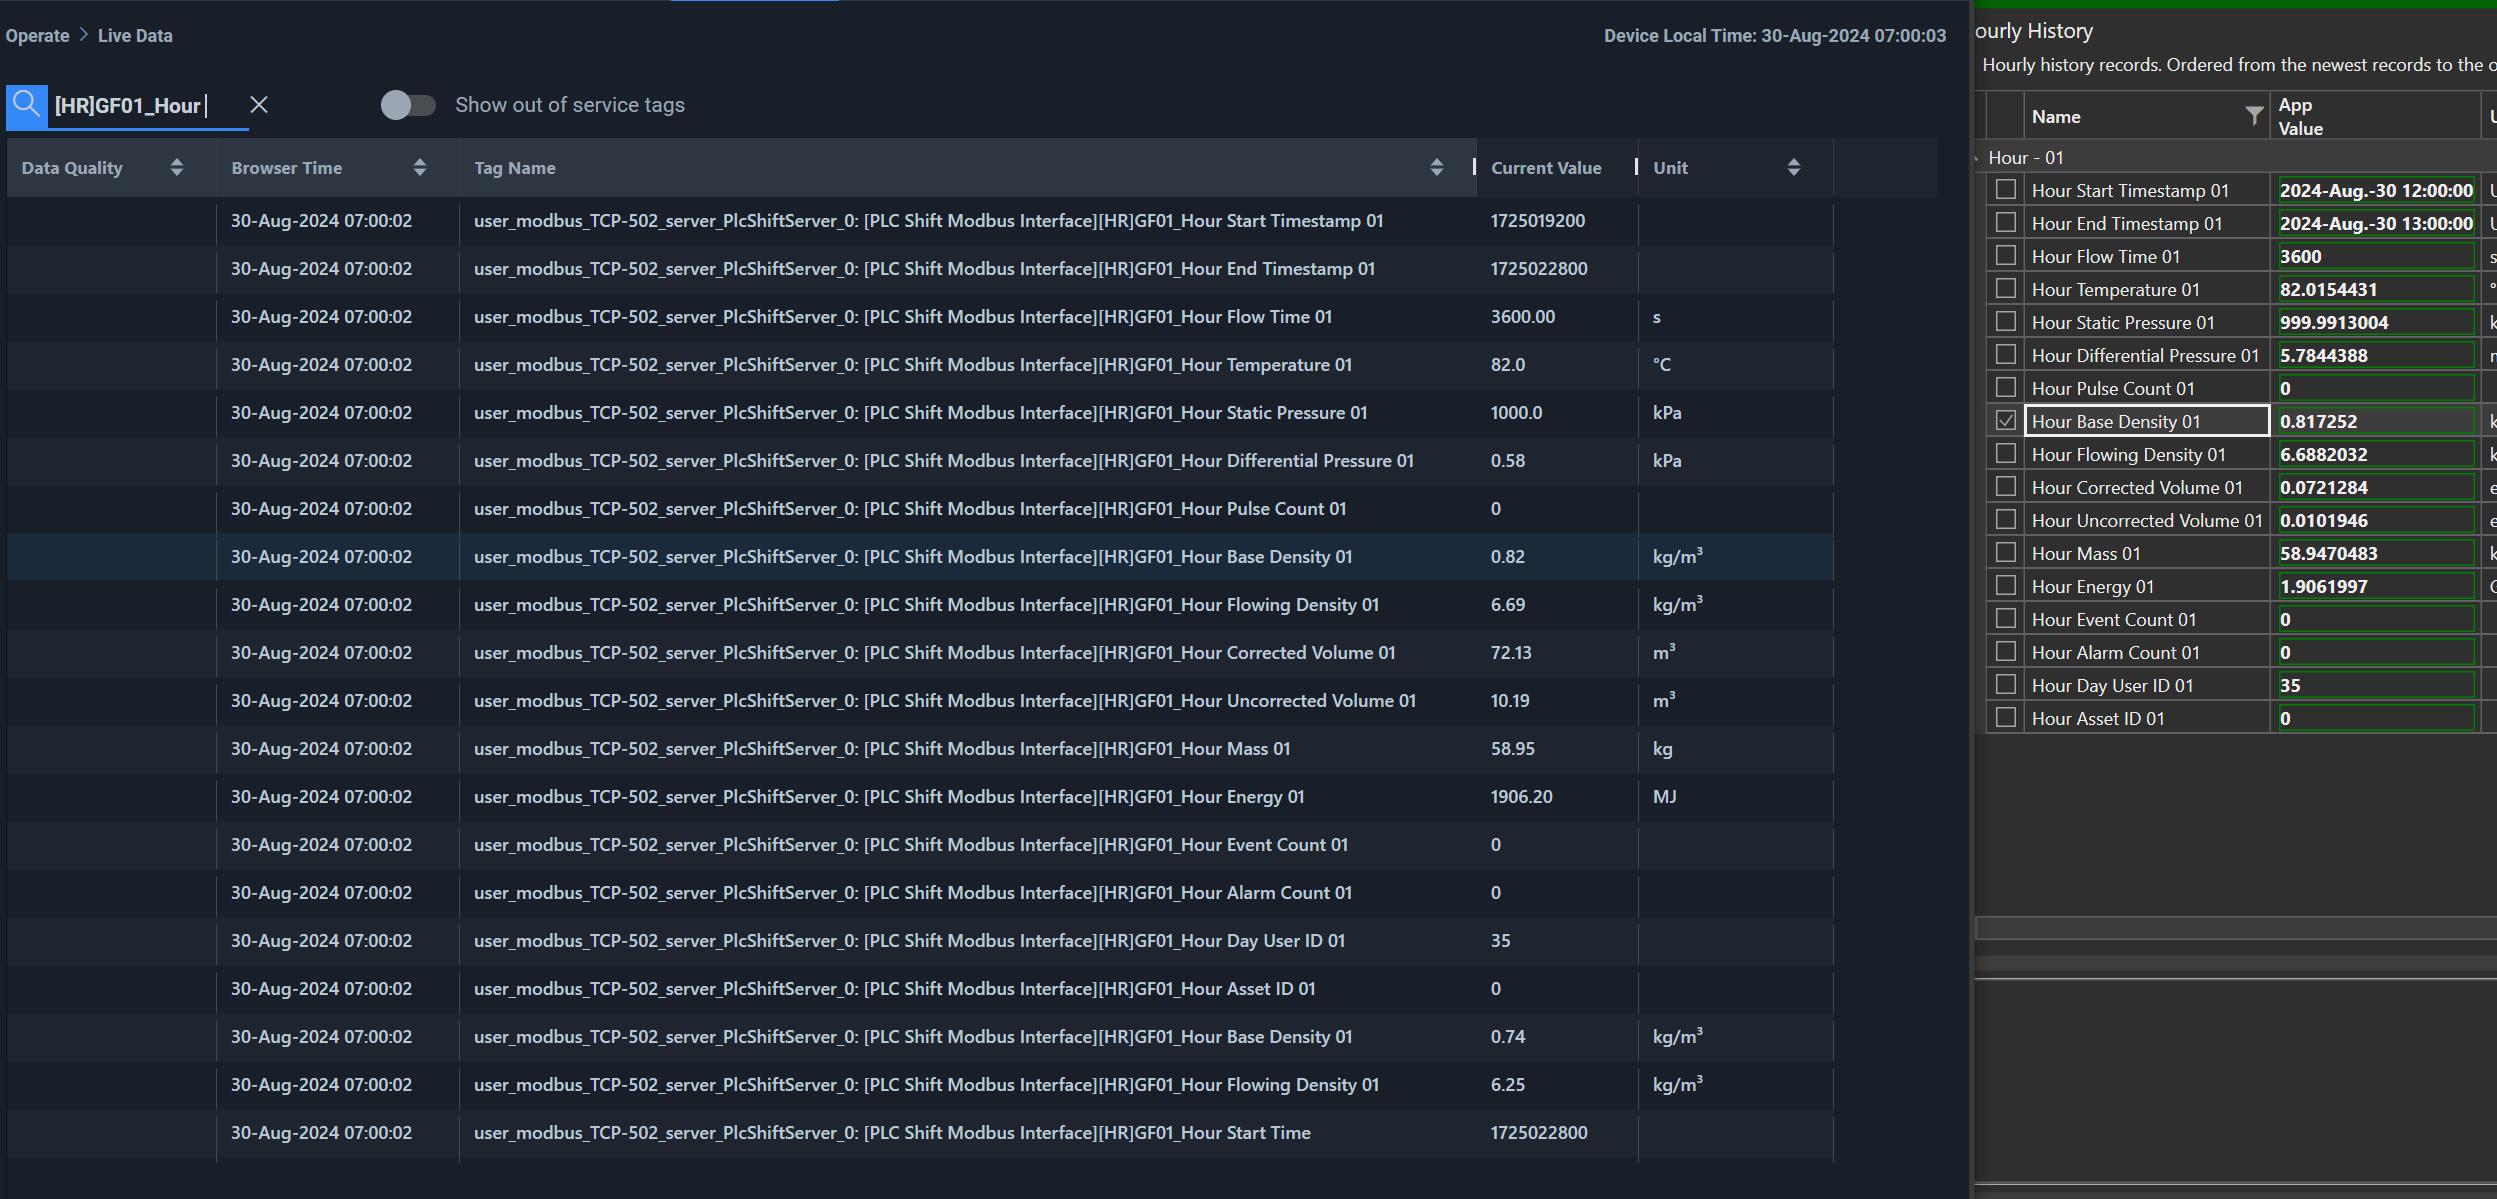 6. Enter '25002' in the 'Modbus Port' parameter if the Modbus TCP server in the HCC2 is configured to use port 502. If you are using port 503 in the HCC2, enter '25003'.7. Select the 'Synchronize' tab, connect the PLC Shift runtime, and download the updated configuration.8. Use the tag browser in the HCC2 to verify that that the values in the HCC2 match those in PLC Shift Manager.
 Application Information in Unity Edge and PLC Shift Manager